Final Project: Detecting if the compost of your composting toilet is ready
Note that I had COVID and strep for the week leading up to the final project symposium; the first day out of isolation was the day of the symposium :( Hence, I'll also be covering some of my inNoVatIve TecHNIques during quarantine and while being sick
Video
https://youtu.be/UAPGCq-VoH0 (opens in a new tab)
fun fact: I used my suitcase to pan around my box :)
Background
Over 40% of the world does not have access to a flushing toilet. By contaminating water, open defecation gives rise to a host of diseases including diarrhea, intestinal worm infections, typhoid, cholera, hepatitis, and polio. Moreover, there are a variety of social issues associated with a lack of toilets within households. For instance, open defecation is not socially accepted for females. This has severe implications. Women are chastised or beaten for openly defecating in the public during the day. That means that from a productivity and quality of life standpoint, those same women, because they don’t want to go to the bathroom during the day, may drink less water or manage their diet in a way so they don’t have to.
Furthermore, females who go to community toilets are often preyed upon. Currently, there is a container system present in some areas. This bucket is emptied by being brought to a fecal waste management facility; sometimes, these facilities are very far away. One of the challenges is it fills up quickly and the more often it fills up, the more they have to pay to have it emptied. In addition, many community toilets are unclean and pay-per-use, which further incentivizes open defecation.
This need for better sanitation has spurred a world-wide effort to brainstorm and implement ways to make toilets more accessible. Some toilets are funded by universities and governments. Others are funded by, at least in some part, philanthropy organizations. The Bill and Melinda Gates Foundation launched the “Reinvent the Toilet Challenge” in 2011 and has had subsequent “Reinvent the Toilet” fairs and expos, with the most recent one being in 2018. At these fairs and expos, scientists show off their toilet designs for the chance to be further funded by the foundation. To date, the foundation has committed more than 200 million dollars. These innovative toilet designs come in different forms, including one that concentrates sunlight to disinfect waste and one that uses ultrasound (sound waves) to remove air pockets from waste, allowing the waste to be more compact. All are linked by a common thread: these toilets are not connected to sewer, water, or electrical lines.
One of the innovative self-containing toilets is a composting toilet. There are some different types of composting toilets. For instance, the Tiger Worms toilet (http://www.tbfenvironmental.in/ (opens in a new tab)) uses tiger worms to degrade waste into compost. There are also these two-pit composting toilets (https://www.sulabhinternational.org/sulabh-technologies/ (opens in a new tab)). These toilets are also here in our home turf. In Boston, there is also a composting toilet company (https://clivusmultrum.com/ (opens in a new tab))
The question is: how can you tell when the compost is ready? Obviously, you can keep on checking the feces turned compost or gain experience in telling when it's ready. However, it would be much more convenient (and accurate) if there were objective metrics to let you know if your compost is ready.
Thus, my idea is to integrate sensors, specifically a temperature sensor and a sensor that detects methane levels, to tell the user if their compost is ready.
Materials Used
thermistor, wires, power bank, 3D printer, mq-4 gas sensor, esp32
Electronics
The premise of my electronics component is that I want to have my ESP32 act as an accesspoint. This is especially important to have ESP32 act as an access point rather than rely on an external router, because since the toilet can be in more rural areas, there might not necessarily be a router nearby.
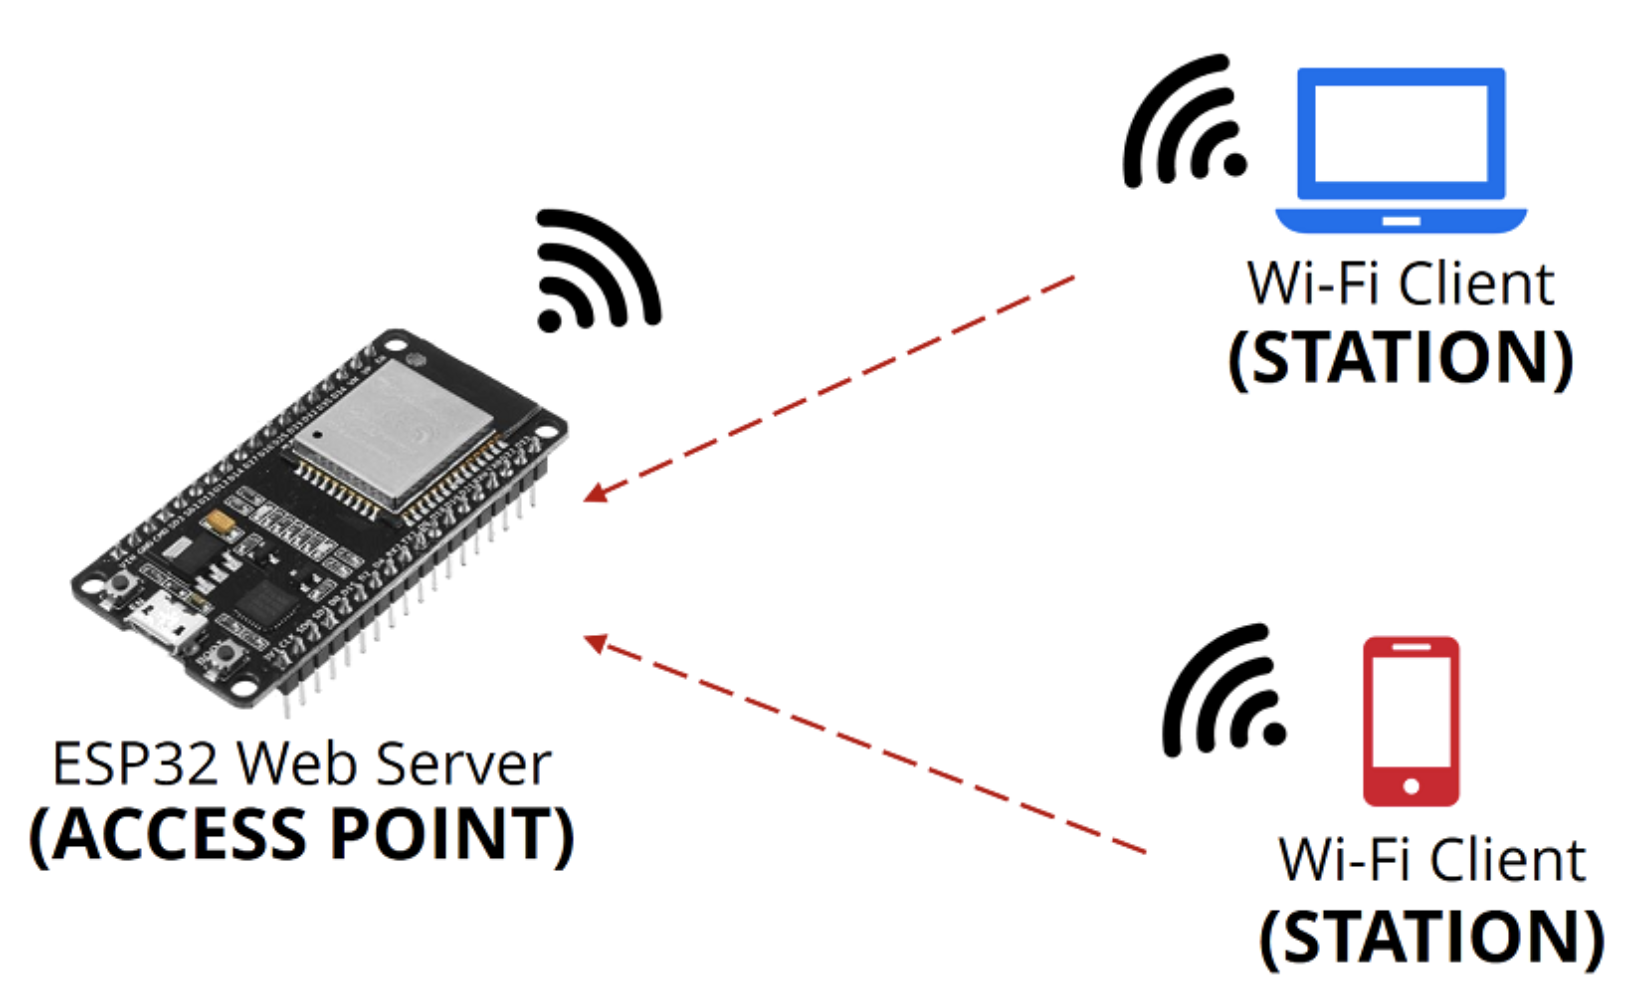
pictorial taken from Random Nerd Tutorials
Most of my electronics and code building process can be found on my page for week 9. To avoid repetition, and to make this page cleaner, I've linked it here. Please check it out, since it's really neat stuff!
Summary
Here is a big picture summary + overview of what happens (Again, please check out my documentation for Week 9 for more detail)
- First, I wired up my breadboard for the thermistor and make sure my temperature code is working
- Them , I wired up my breadboard for the gas sensor and make sure my gas sensing code is working.
- With each of these components underway, I then merged these components together and get the access point component to work.
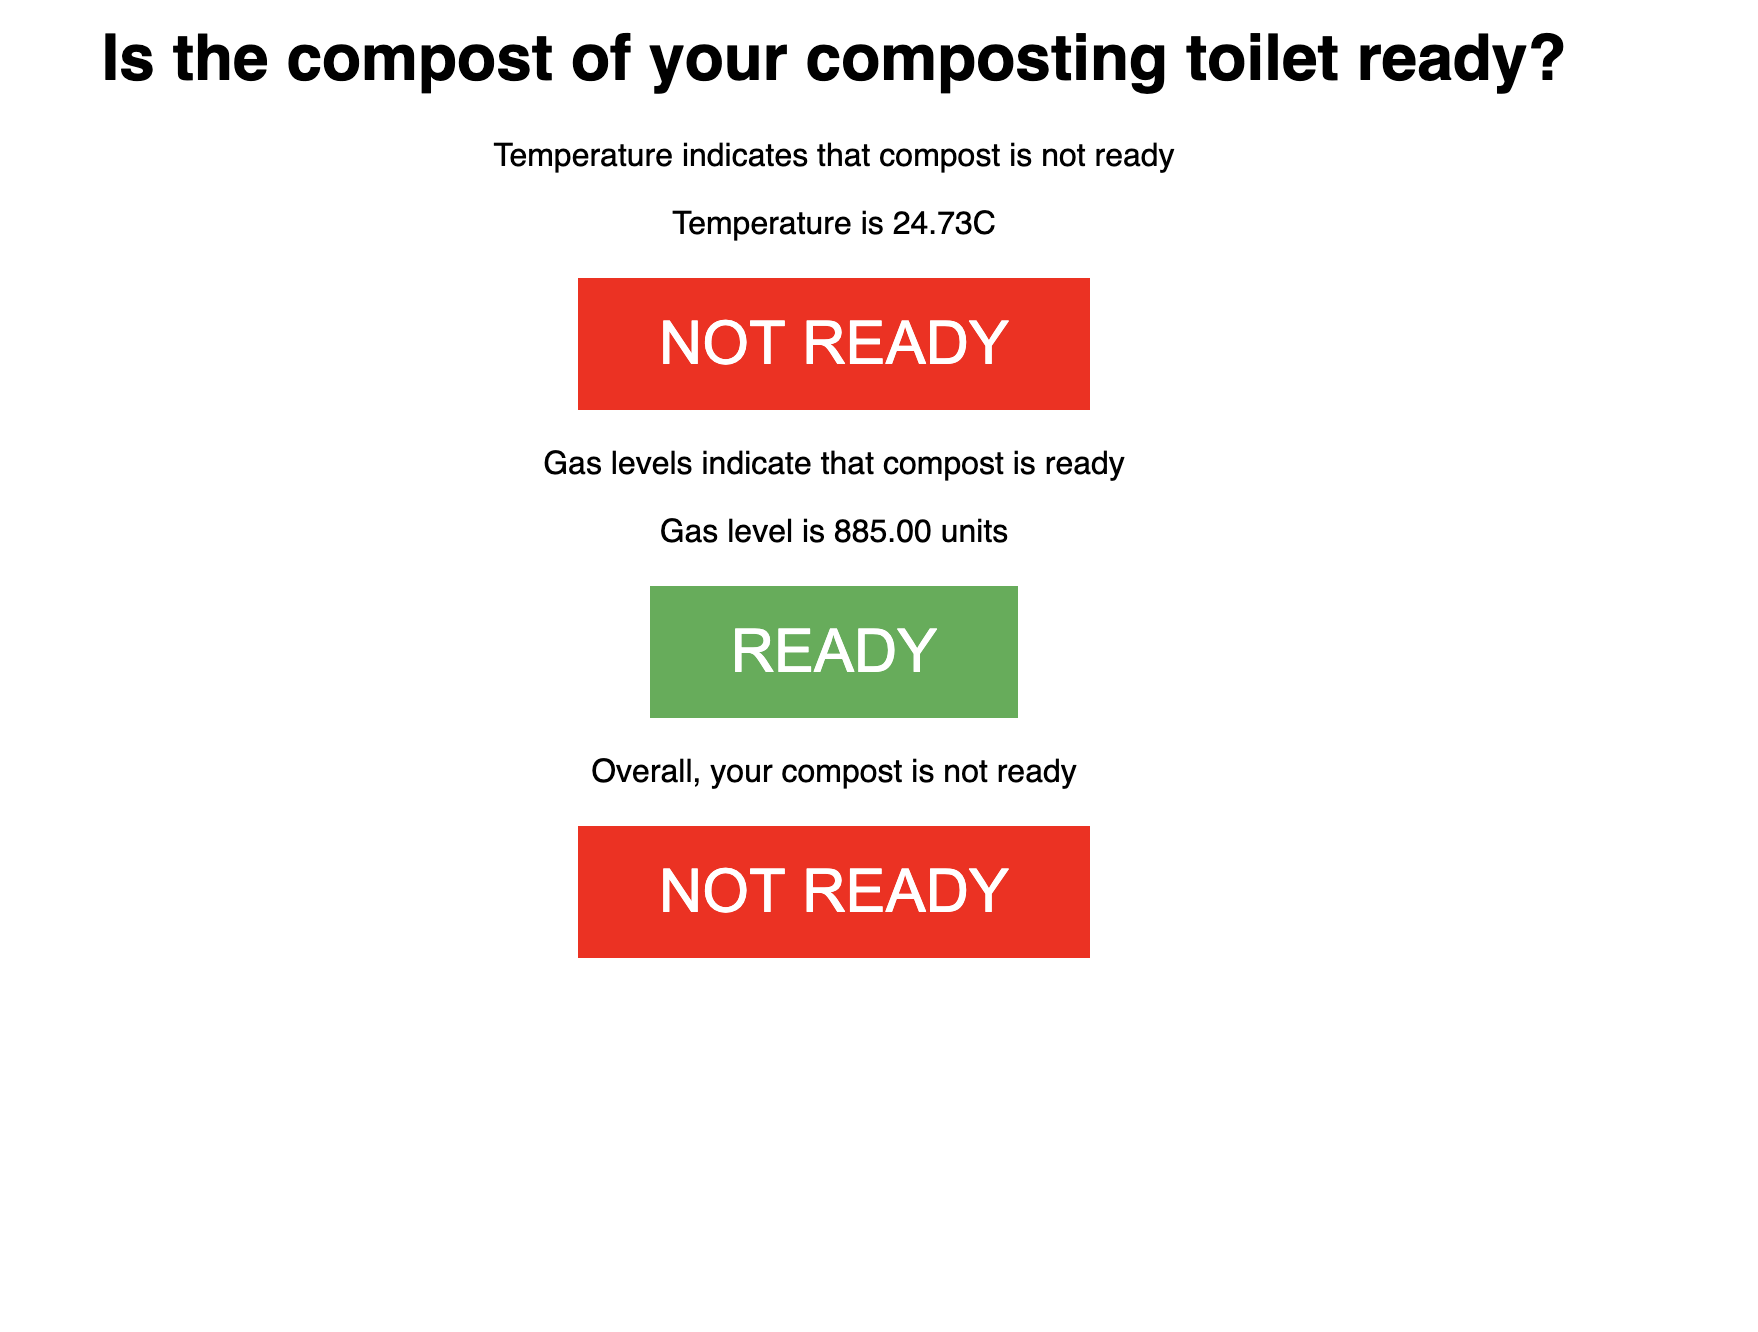
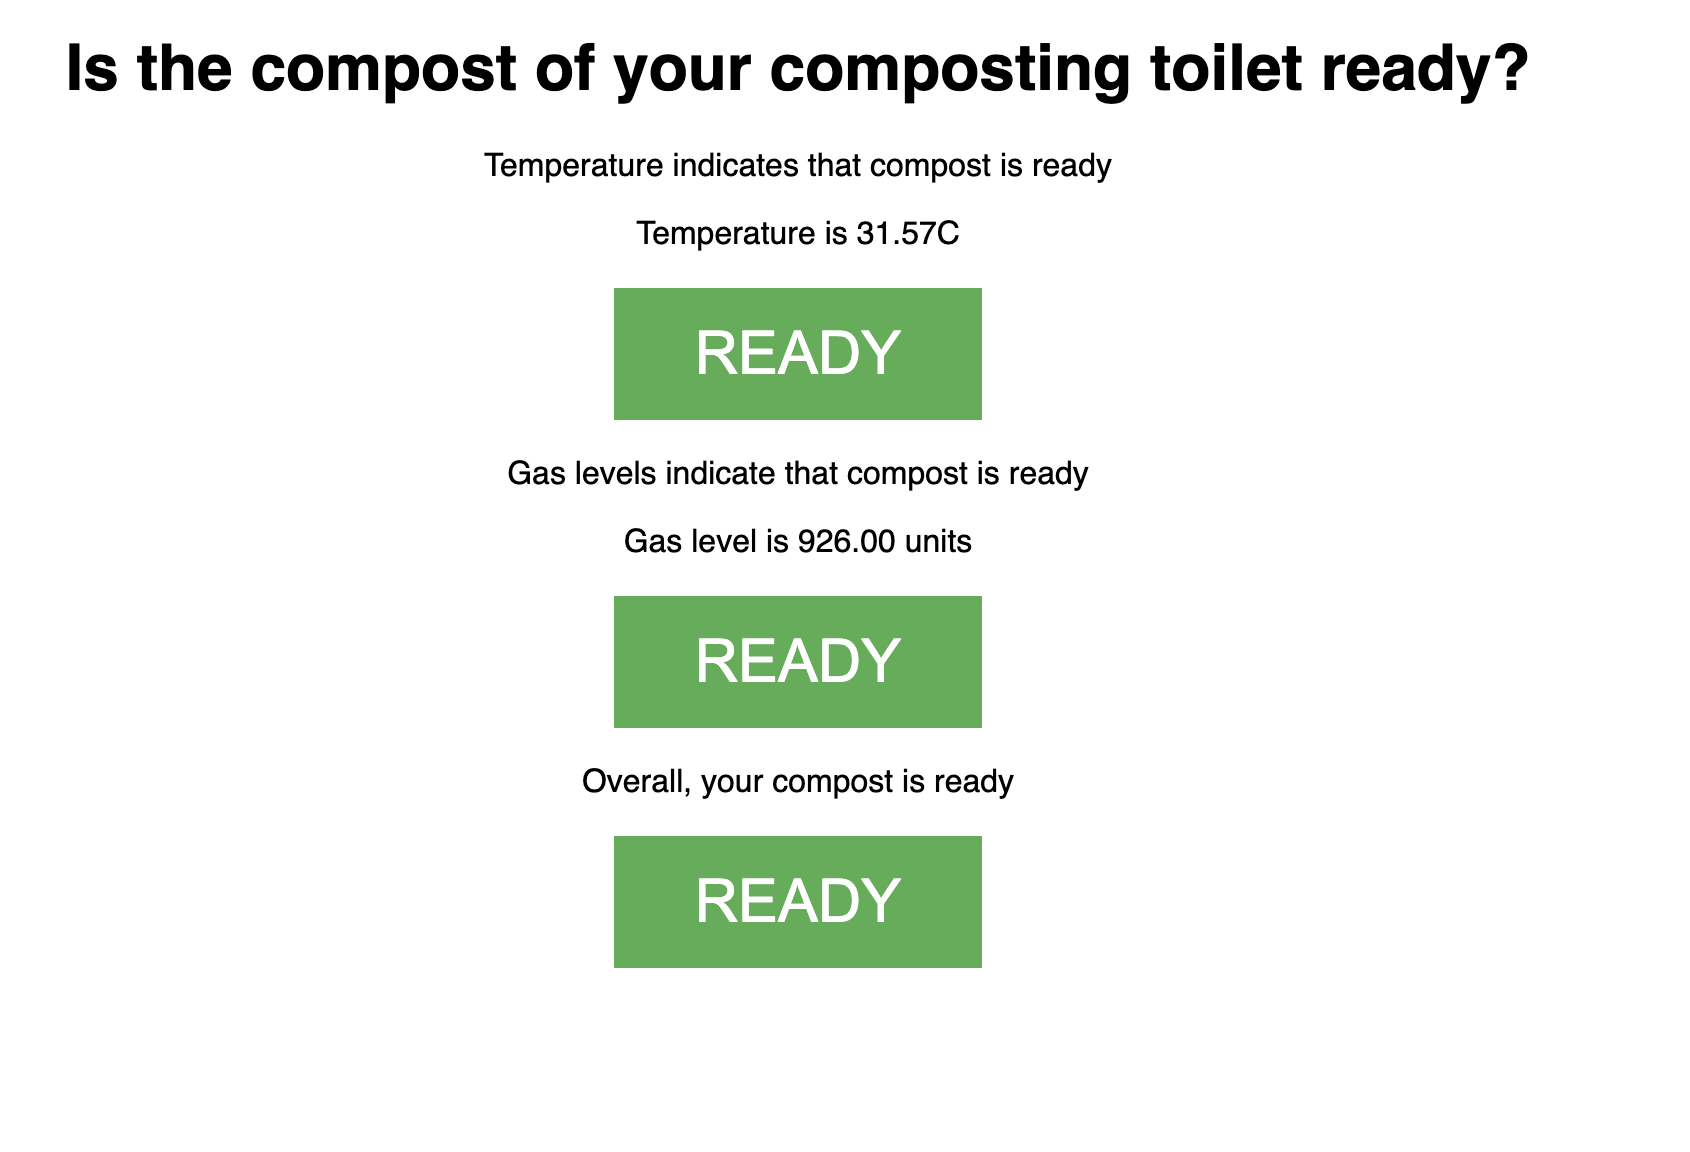
- I then had the code to essentially set up my ESP32 asthe access point, for instance putting in information like what I want to call my ESP32 access point and the password to login to the access point. I will also design the website to have three buttons. One will show if the gas levels indicate that the compost from the composting toilet is ready. One button will show if, overall, the compost is ready.
- When I upload and run the accesspoint temperature + gas code on the Arduino, I got an IP address in the serial monitor
- I then login-ed to the ESP32 network and type in the password
- I then pressed the restart button on my Arduino, and watch as the website updates to see if my compost is ready.
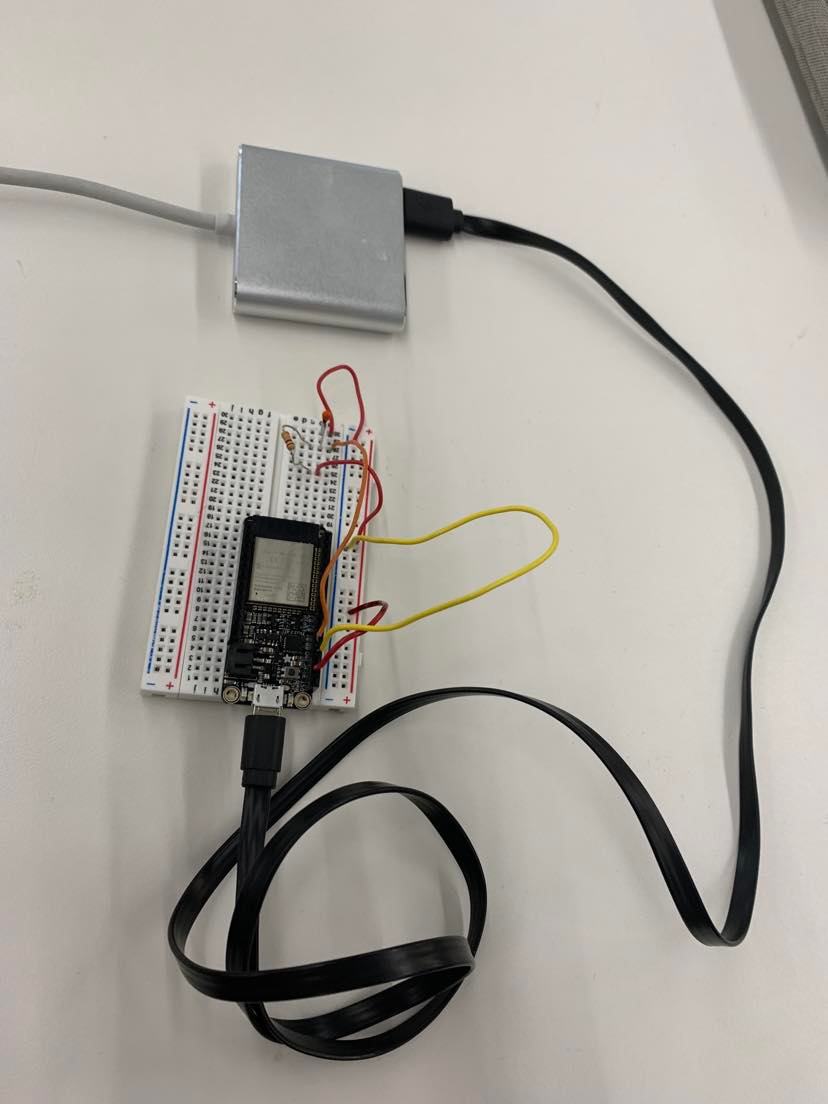
Here is the breadboard I ultimately used
This is the final code I used
// Load Wi-Fi library
#include <WiFi.h>

//Define for gas sensor
#define MQ4pin (A2) //changed from A0
float sensorValue;  //variable to store sensor value

// Replace with your network credentials
const char* ssid     = "ESP32-Access-Point";
const char* password = "123456789";

// Set web server port number to 80
WiFiServer server(80);

// Variable to store the HTTP request
String header;


//taken from Rob's code
int ThermistorPin = A3; //can't be A0 pin according to https://nathanmelenbrink.github.io/ps70/10_networking/setup.html
int Vo;
float R1 = 10000;
float R2, T;
float A = 3.354e-03;
float B = 2.5698e-4;
String TEString;
String temperatureState;
String gasState;
String overallState;

void setup() {
  Serial.begin(115200);
  analogReadResolution(12);                 //Using a 32-bit ATSAM microcontroller that has up to 12 bit resolution. 4095 max. Taken from Rob's code
  // Initialize the output variables as outputs


  // Connect to Wi-Fi network with SSID and password
  Serial.print("Setting AP (Access Point)…");
  // Remove the password parameter, if you want the AP (Access Point) to be open
  WiFi.softAP(ssid, password);

  IPAddress IP = WiFi.softAPIP();
  Serial.print("AP IP address: ");
  Serial.println(IP);

  server.begin();
}

void loop(){
  //Temperature
  Vo = analogRead(ThermistorPin);
  //Serial.println(ThermistorPin);
  R2 = R1 * 1/(4096.0 / (float)Vo - 1.0);         //Calculate resistance of thermistor from voltage divider math.
  T = (1.0 / (A + B*log(R2/R1) ));                 // Calculate temperature using datasheet formula.
  T = T - 273.15;                                   //Convert from Kelvin to Celcius.


  Serial.print("Temperature: ");
  Serial.print(T);
  Serial.println("C");

  delay(500);
  TEString = String(T);
  if (T>30) {
    temperatureState ="ready";
  } else {
    temperatureState = "not ready";
  }

  // Temperature end

  //Gas
   sensorValue = analogRead(MQ2pin); // read analog input pin 0

  Serial.print("Sensor Value: ");
  Serial.print(sensorValue);

  Serial.println("");
  delay(2000); // wait 2s for next reading
  if (sensorValue > 800) {
    gasState ="ready";
  } else {
    gasState = "not ready";
  }

  //Gas end

  //Overall Start
  if (gasState == "ready" & temperatureState == "ready") {
    overallState = "ready";
  } else {
    overallState = "not ready";

  }
  //Overall end

  WiFiClient client = server.available();   // Listen for incoming clients

  if (client) {                             // If a new client connects,
    Serial.println("New Client.");          // print a message out in the serial port
    String currentLine = "";                // make a String to hold incoming data from the client
    while (client.connected()) {            // loop while the client's connected
      if (client.available()) {             // if there's bytes to read from the client,
        char c = client.read();             // read a byte, then
        Serial.write(c);                    // print it out the serial monitor
        header += c;
        if (c == '\n') {                    // if the byte is a newline character
          // if the current line is blank, you got two newline characters in a row.
          // that's the end of the client HTTP request, so send a response:
          if (currentLine.length() == 0) {
            // HTTP headers always start with a response code (e.g. HTTP/1.1 200 OK)
            // and a content-type so the client knows what's coming, then a blank line:
            client.println("HTTP/1.1 200 OK");
            client.println("Content-type:text/html");
            client.println("Connection: close");
            client.println();


            // Display the HTML web page
            client.println("<!DOCTYPE html><html>");
            client.println("<head><meta name=\"viewport\" content=\"width=device-width, initial-scale=1\">");
            client.println("<link rel=\"icon\" href=\"data:,\">");
            // CSS to style the on/off buttons
            // Feel free to change the background-color and font-size attributes to fit your preferences
            client.println("<style>html { font-family: Helvetica; display: inline-block; margin: 0px auto; text-align: center;}");
            client.println(".button { background-color: #FF0000; border: none; color: white; padding: 16px 40px;"); //changed to Red
            client.println("text-decoration: none; font-size: 30px; margin: 2px; cursor: pointer;}");
            client.println(".button2 {background-color: #4CAF50 ;}</style></head>"); //changed to Green

            // Web Page Heading
            client.println("<body><h1>Is the compost of your composting toilet ready? </h1>");


            client.println("Temperature indicates that compost is " + temperatureState + "</p>");
            client.println("Temperature is " + TEString + "C" + "</p>");
            // If the output27State is off, it displays the ON button
            if (temperatureState=="not ready") {
              client.println("<p><a href=\"/26/on\"><button class=\"button\">NOT READY</button></a></p>");
            } else {
              client.println("<p><a href=\"/26/off\"><button class=\"button button2\">READY</button></a></p>");
            }
            client.println("</body></html>");

            // Gas website

            client.println("Gas levels indicate that compost is " + gasState + "</p>");
            client.println("Gas level is " + String(sensorValue) + " units" + "</p>");
              if (gasState == "not ready") {
              client.println("<p><a href=\"/27/on\"><button class=\"button\">NOT READY</button></a></p>");
            } else {
              client.println("<p><a href=\"/27/off\"><button class=\"button button2\">READY</button></a></p>");
            }
              client.println("</body></html>");

            // Overall

            client.println("Overall, your compost is " + overallState + "</p>");
            if (overallState == "not ready") {
              client.println("<p><a href=\"/27/on\"><button class=\"button\">NOT READY</button></a></p>");
            } else {
              client.println("<p><a href=\"/27/off\"><button class=\"button button2\">READY</button></a></p>");
            }
              client.println("</body></html>");

            // The HTTP response ends with another blank line
            client.println();
            // Break out of the while loop
            break;
          } else { // if you got a newline, then clear currentLine
            currentLine = "";
          }
        } else if (c != '\r') {  // if you got anything else but a carriage return character,
          currentLine += c;      // add it to the end of the currentLine
        }
      }
    }
    // Clear the header variable
    header = "";
    // Close the connection
    client.stop();
    Serial.println("Client disconnected.");
    Serial.println("");

}
}
Ultimately, I get an interface that looks like this:
Again, check out my Week 9 documentation for more details!
The main things I changed is that since this needed to be portable, I made sure that I was connecting to a rechargeable battery source rather than my laptop.
I will also detail more changes I made in the Assembly section below since the other changes came up once I started assembling it with my dry box.
Dry Box
I wanted to have a dry box for my electronics. After all, my electronics would be in a composting pit. Thus, I wanted the electronics (breadboard, wires, ESP32, battery, etc) to be dry. Thus, I decided to make a box that I could use to easily access the ESP32 and electronics but also would have a lid to close it. Moreover, I wanted it to look like a toilet tank.
To do this, I first looked at this link Autodesk gallery link (https://gallery.autodesk.com/fusion360/projects/39953/box-w-hinges (opens in a new tab)), which features a box with hinges. It wasn't exactly what I wanted but it has hinges so I thought it would be a good starting point.
Hence, I decided to adapt it. I looked into the history of how the file was made to change the dimensions, make additional extrusions, make it what I need it to be.
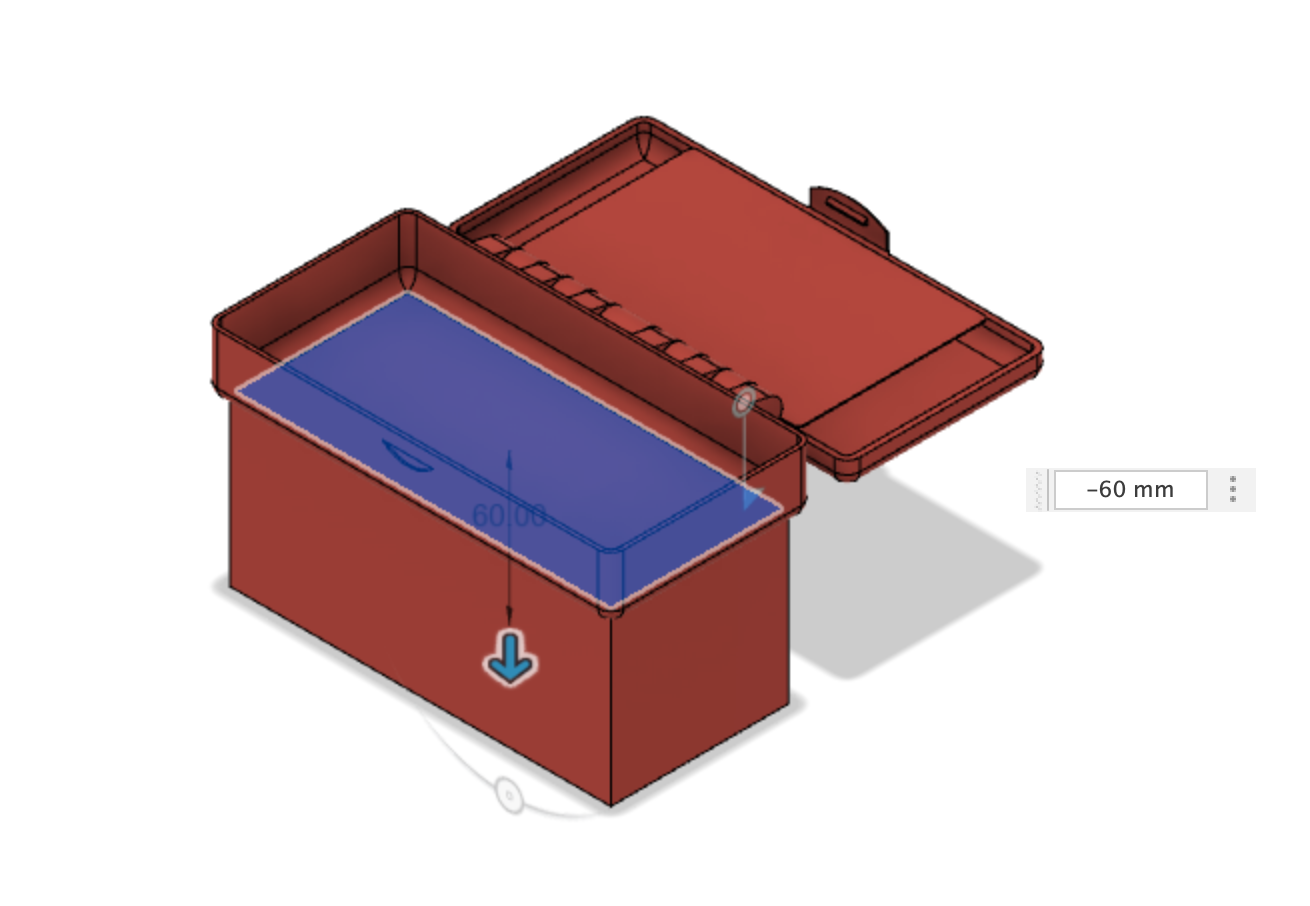
I first needed to make sure that the box could fit everything. It needed to fit all the electronics and also the rechargeable battery source. Thus, using a caliper, I determined that I wanted the box to be 150 mm(length) X 70 mm (depth) X 85 mm (height).
I went to the history of the box of the autodesk file and began editing the dimsensions of the sketch. I changed both the dimensions of the lid, as well as the main box. To note, I used the colinear tool beccause I wanted to maintain the hinges in the middle. I also used different tools like the midpoint constrain tools. Thus, I changed the dimensions and used the colinear tool to ensure that the center is maintained.
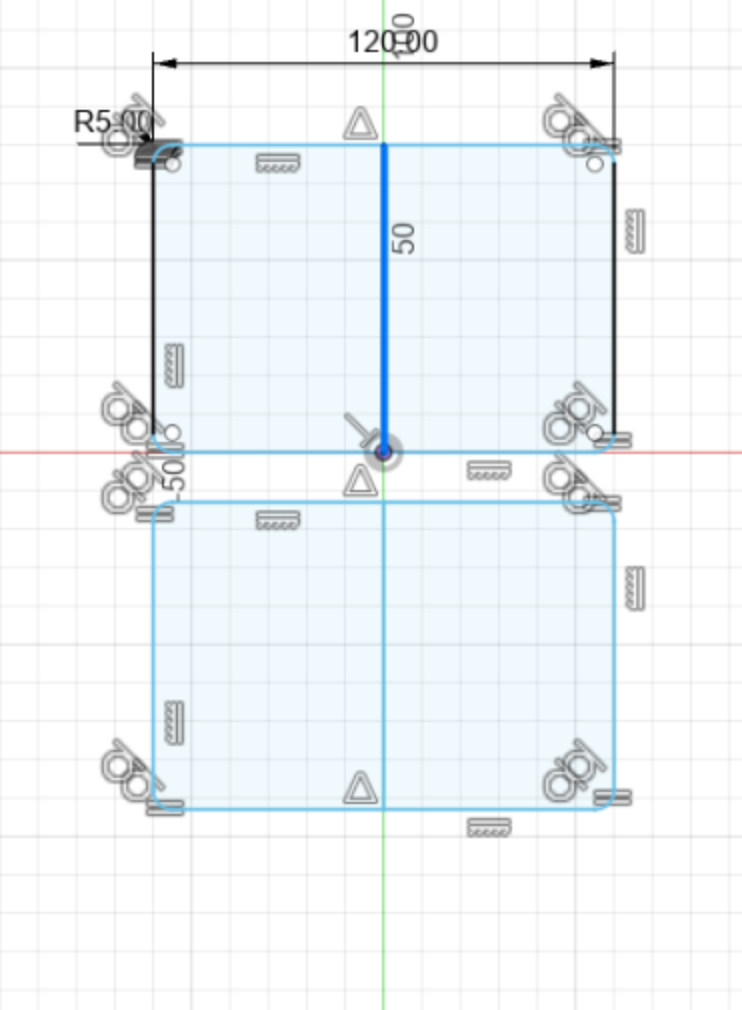

As part of my design, I wanted a lip to say "Composting toilet monitor" to stand out. Hence, I decided to take the existing structure and then extrude to the depth that I need the box to be (hence, so the total height is 85 mm). Hence, since the lip is 20 mm, I extruded the base of the box by another 65 mm.
I then cut the hole of the box. Specifically, I used the extrusion tool from the top view to cut a rectangle 66.68 mm X 146.80 mm inwards for 60mm.
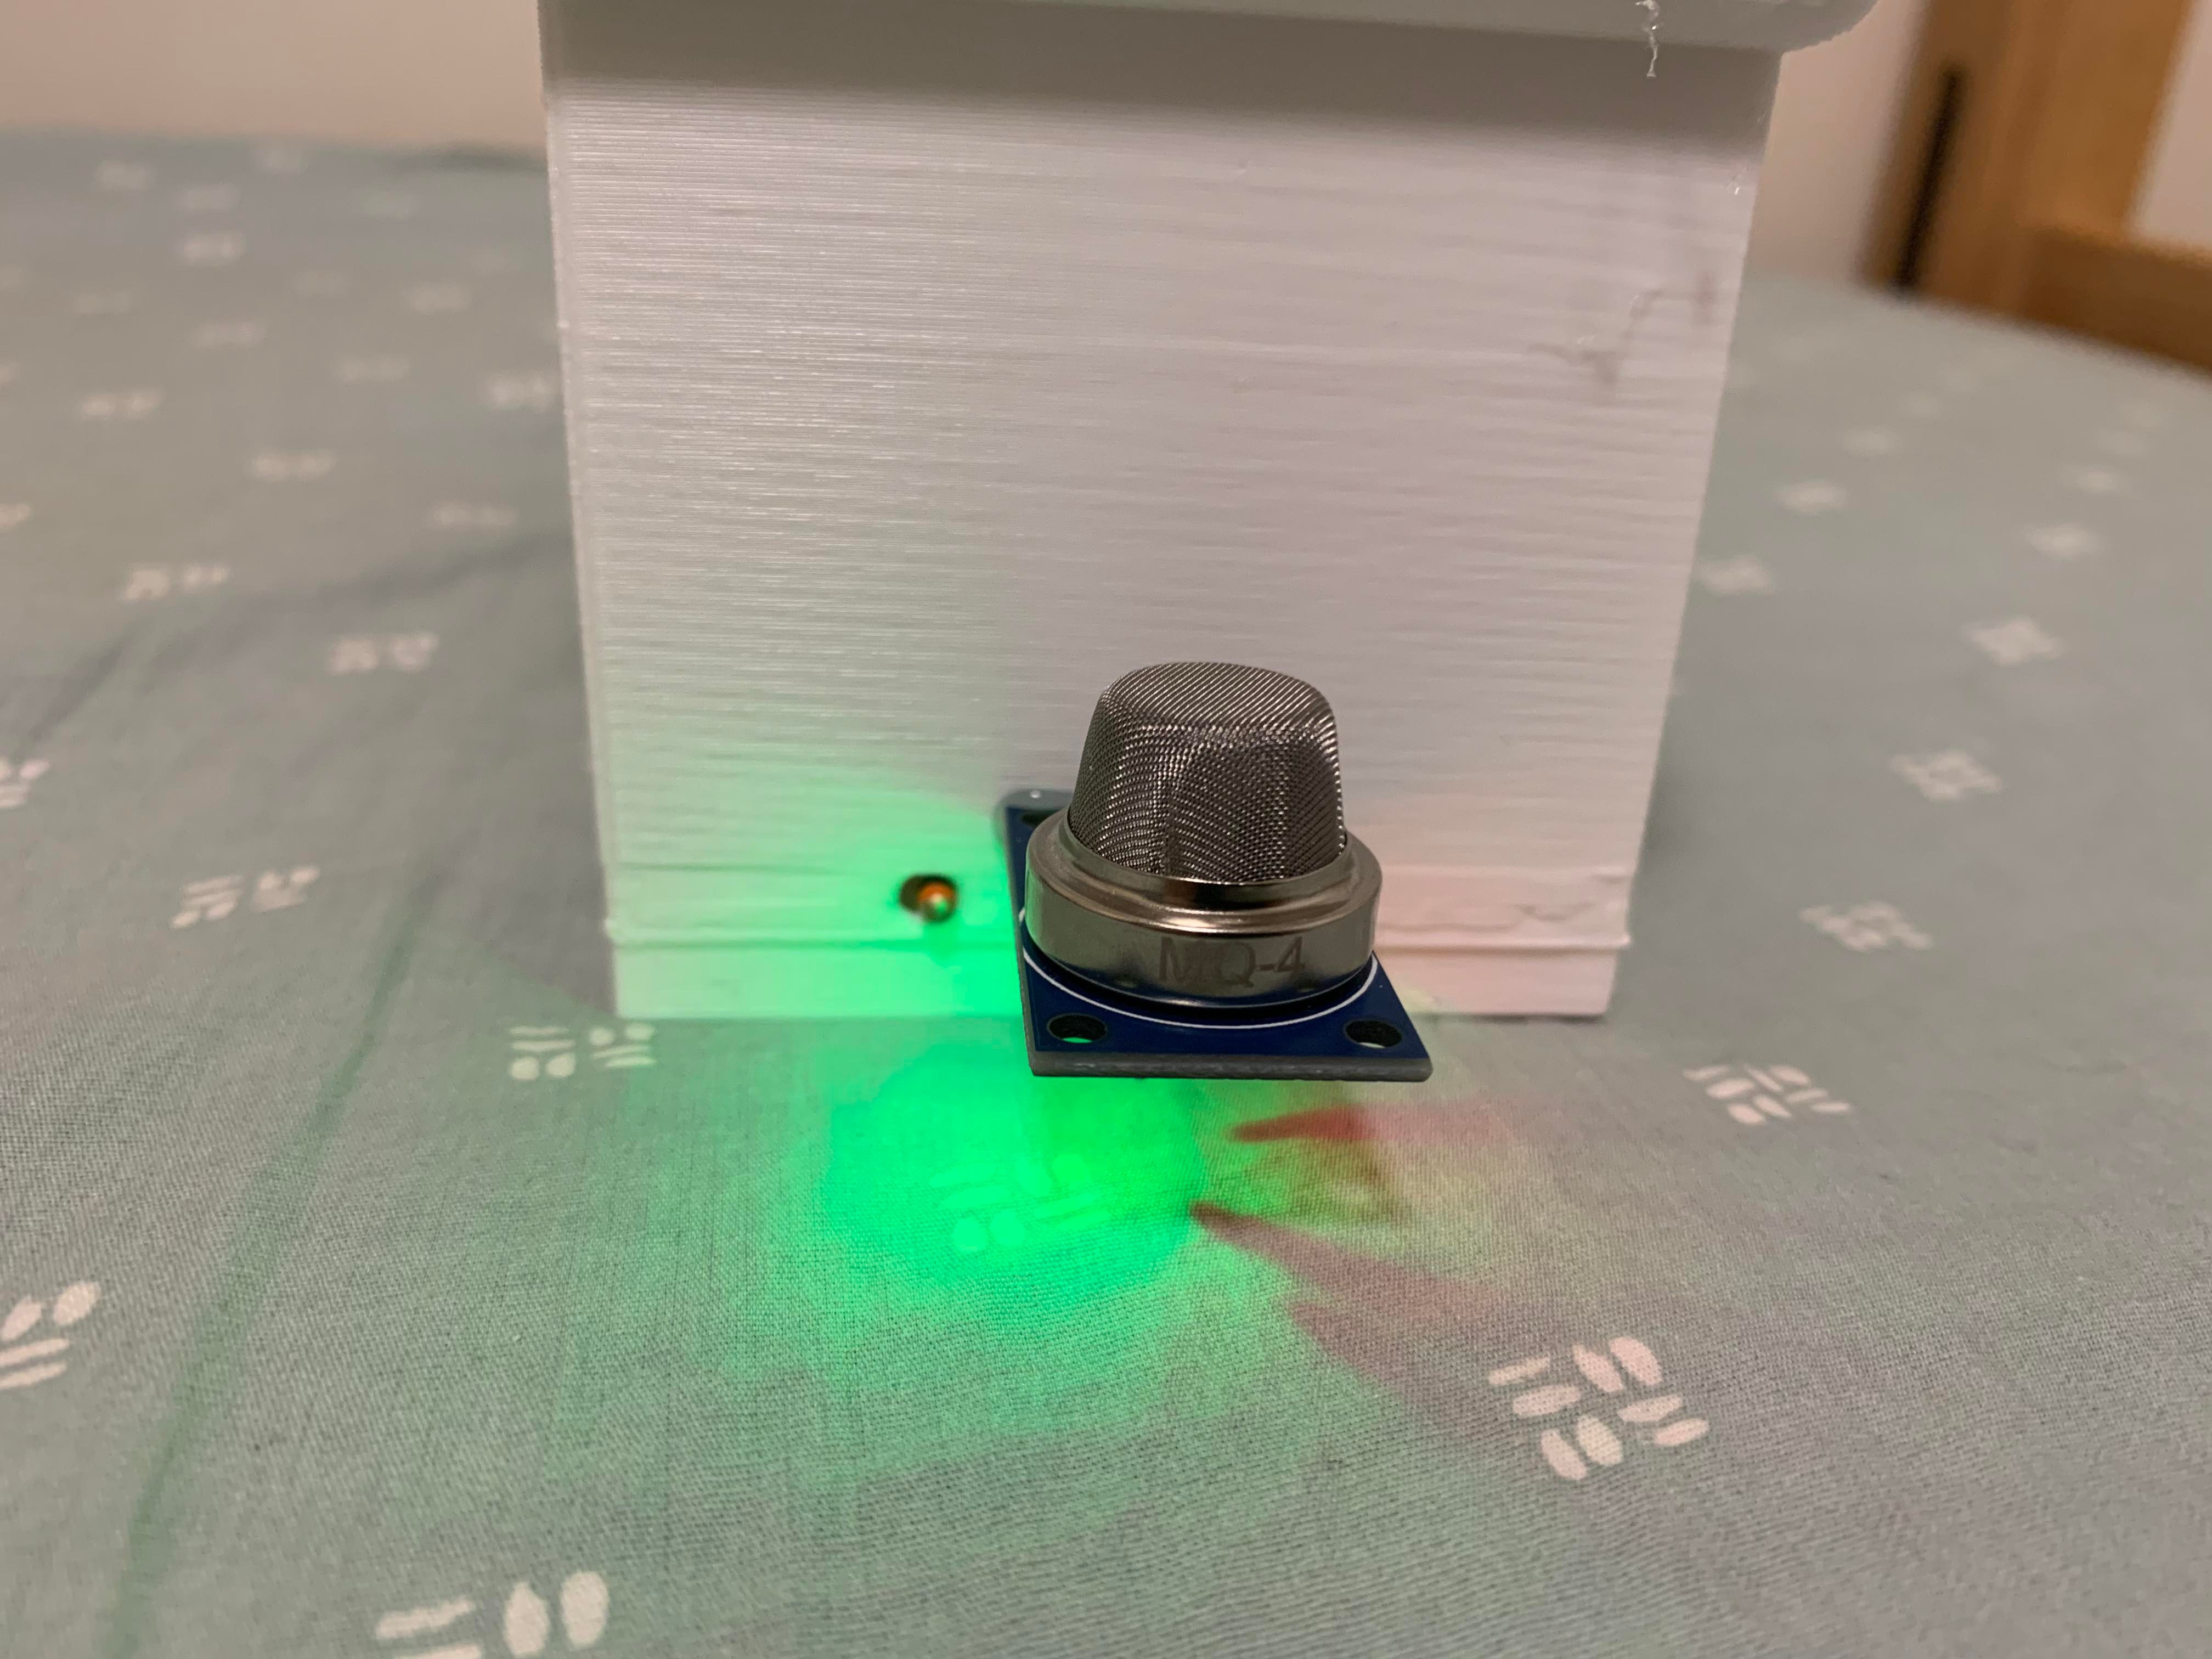
I then made the slots for the thermistor and the gas sensor. I first measured the dimensions. I wanted the thermistor to be able to fit into a hole. Thus, I made the hole to be 4mm in diameter.
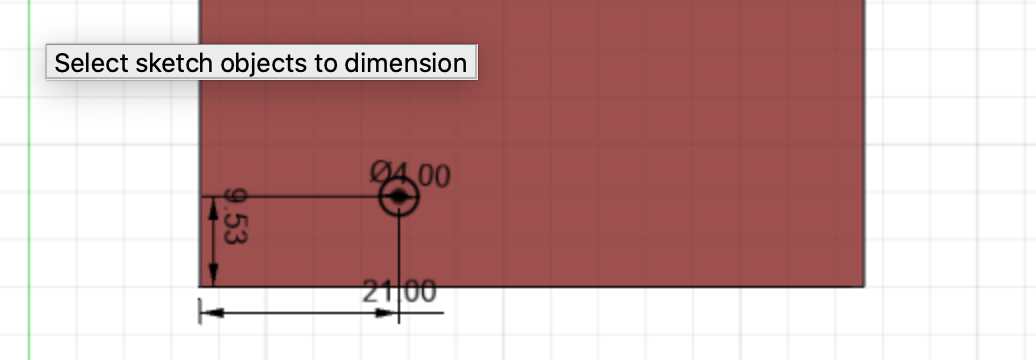
I also wanted to have rectanglular hole that is slightly smaller than the space of the 4 different input wires, so I could glue the female end on the inside of the box and have the gas sensor be able to pox through the rectangular hole straight into the female ends of the wires. Hence, I made this a 2.6 X 10.6 mm rectangle
To position where the holes should be I modeled them by stretching across the thermistor and the gas sensor and measured how far it was away from the bottom of the breadboard. I determined that the thermistor should be 9.53 mm above ground, 21 mm from the left side. The rectangular hole for the gas sensor wires should have the line of the rectangle closest to the bottom be 9.5 mm away and 8.762 mm away from the hole for the thermositer.

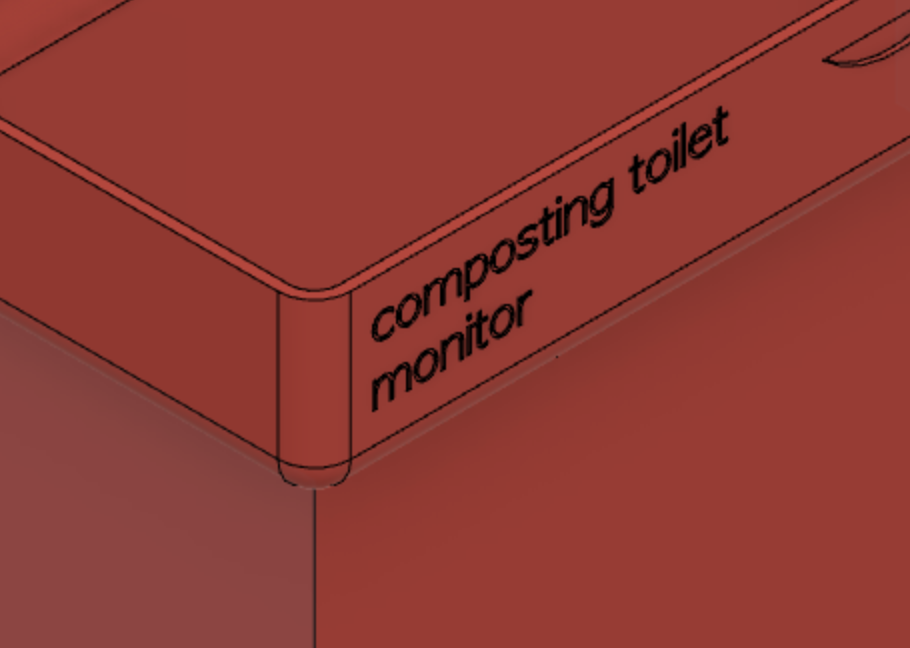
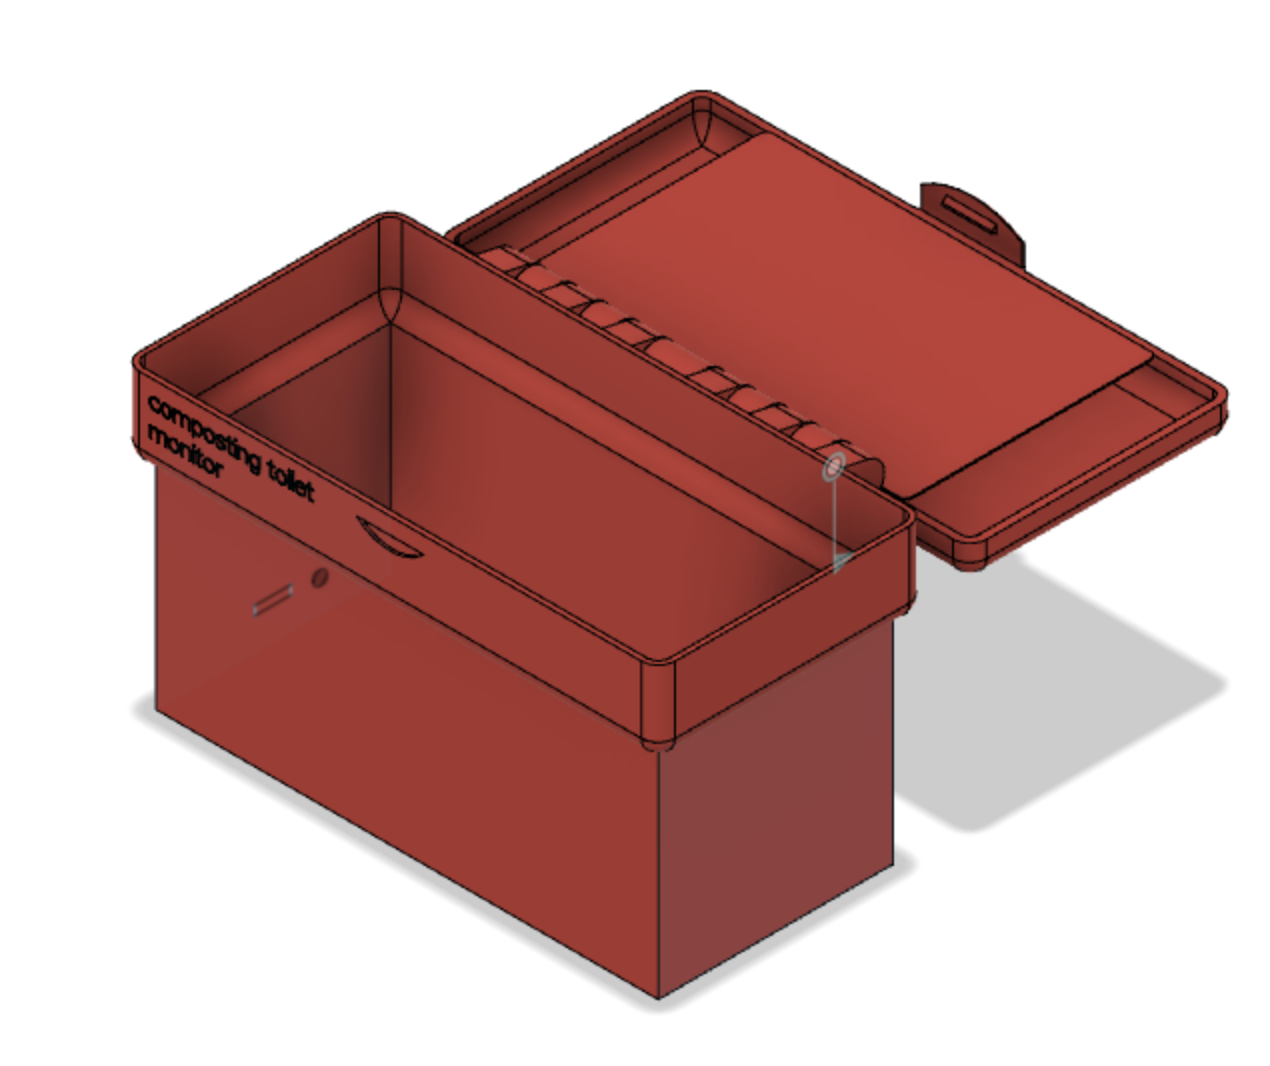
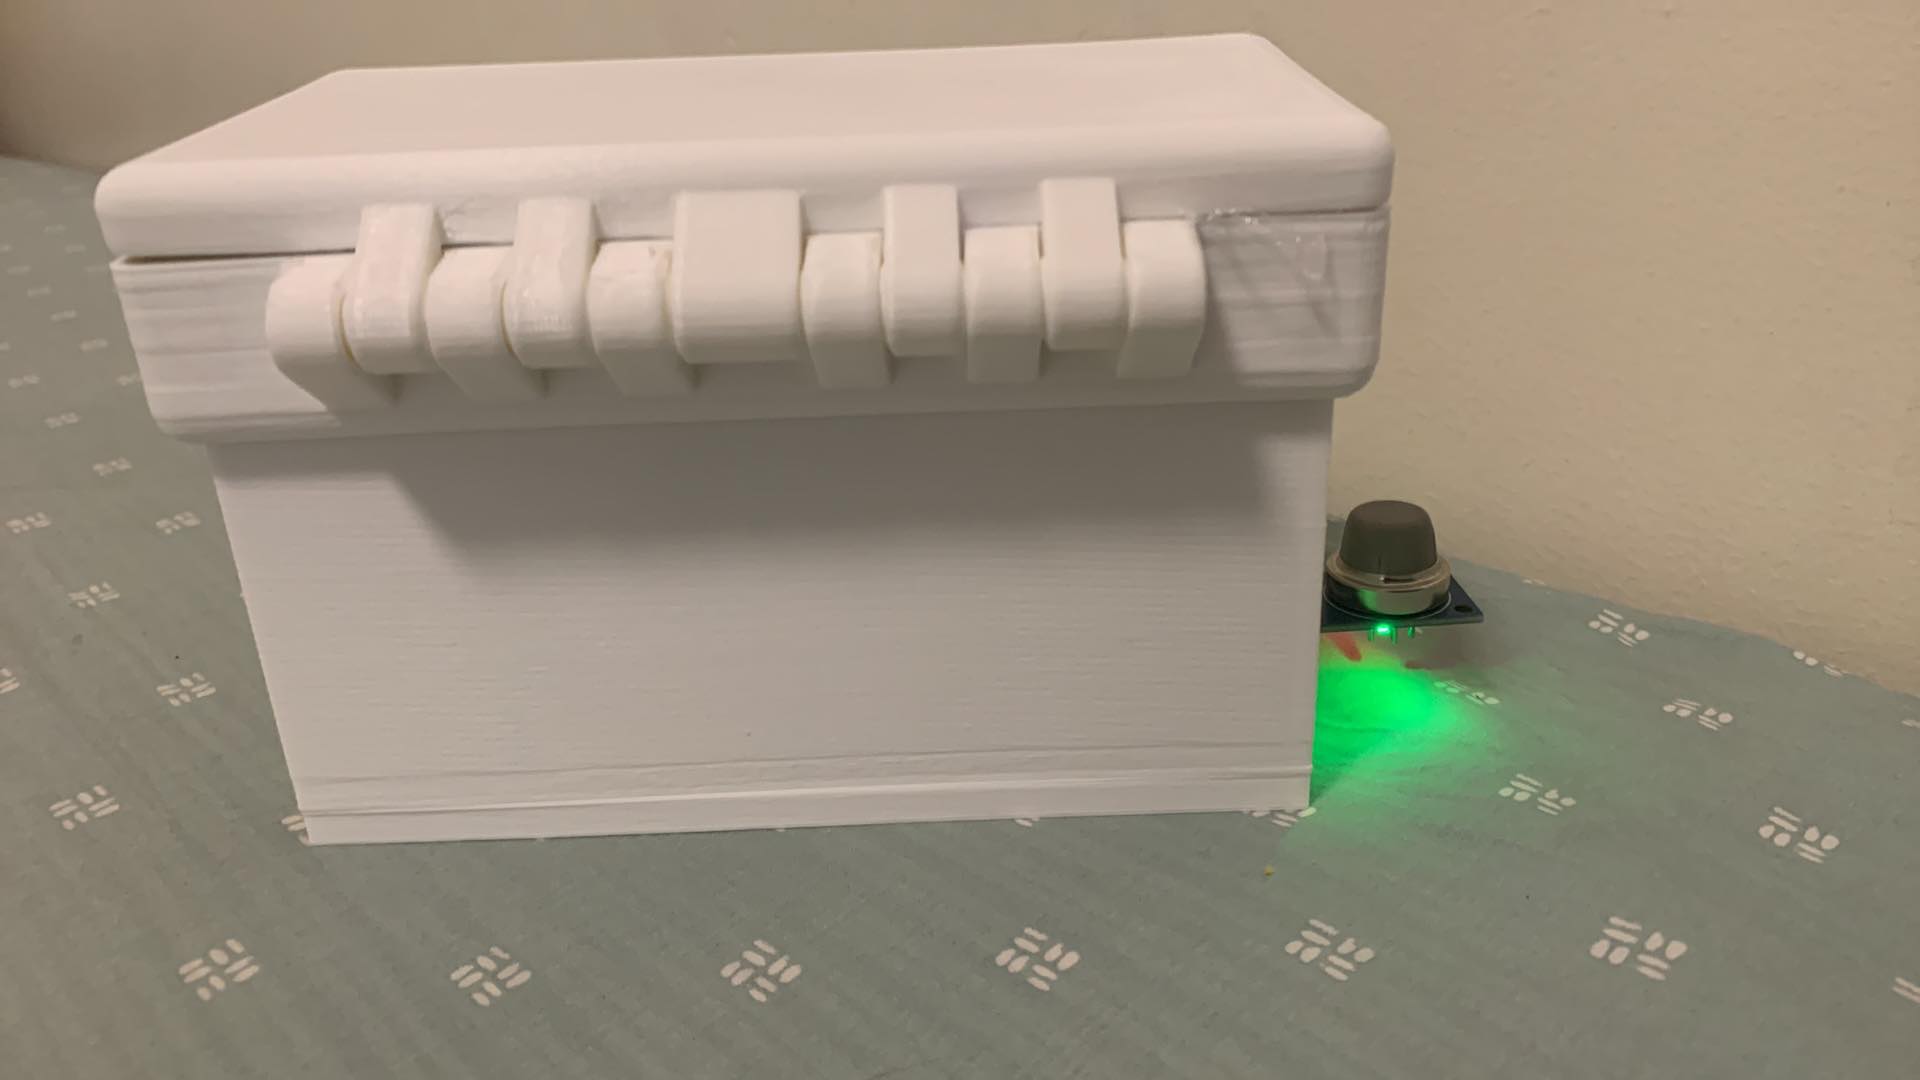
Lastly, I decided to make an indent of the words "compost toilet monitor." That way, if someone sees my monitor in a compost pit, they'd know what it's for. It looks like this!
Here is the final CAD file (click here to download!
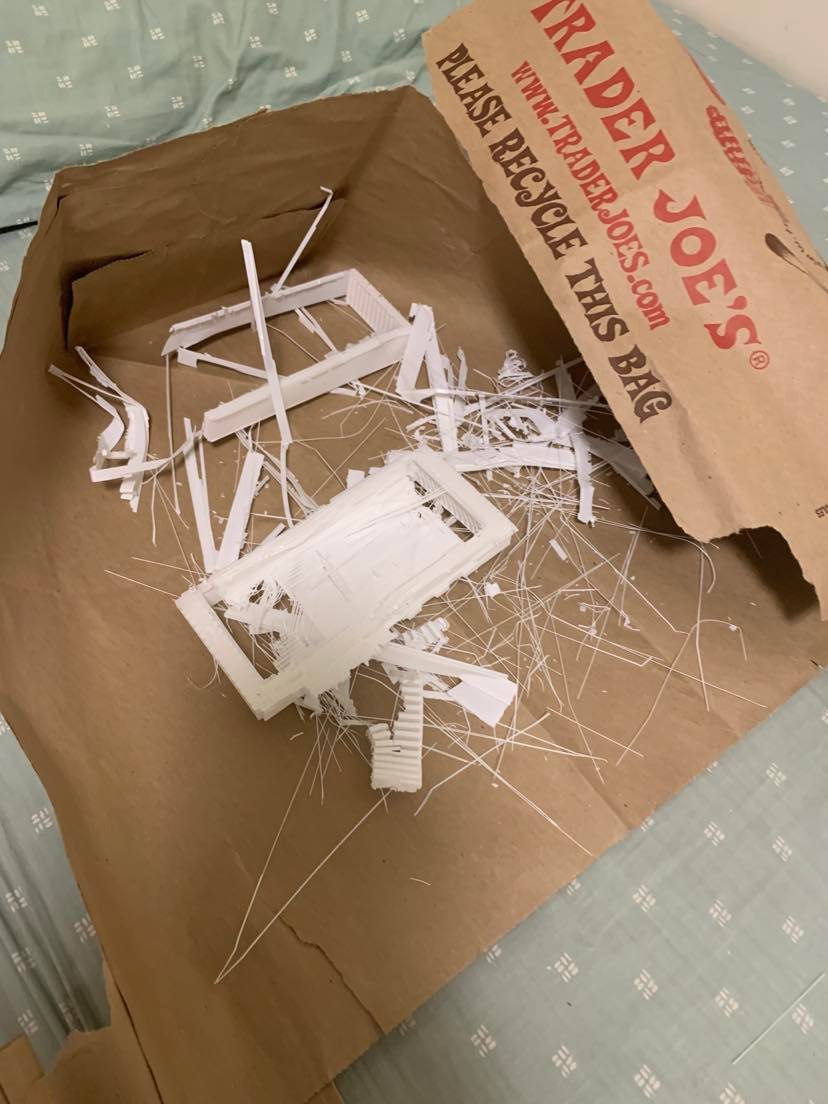
After 3D printing it, I used pliers to yank out the support structure. This is all the stuff I yanked out!
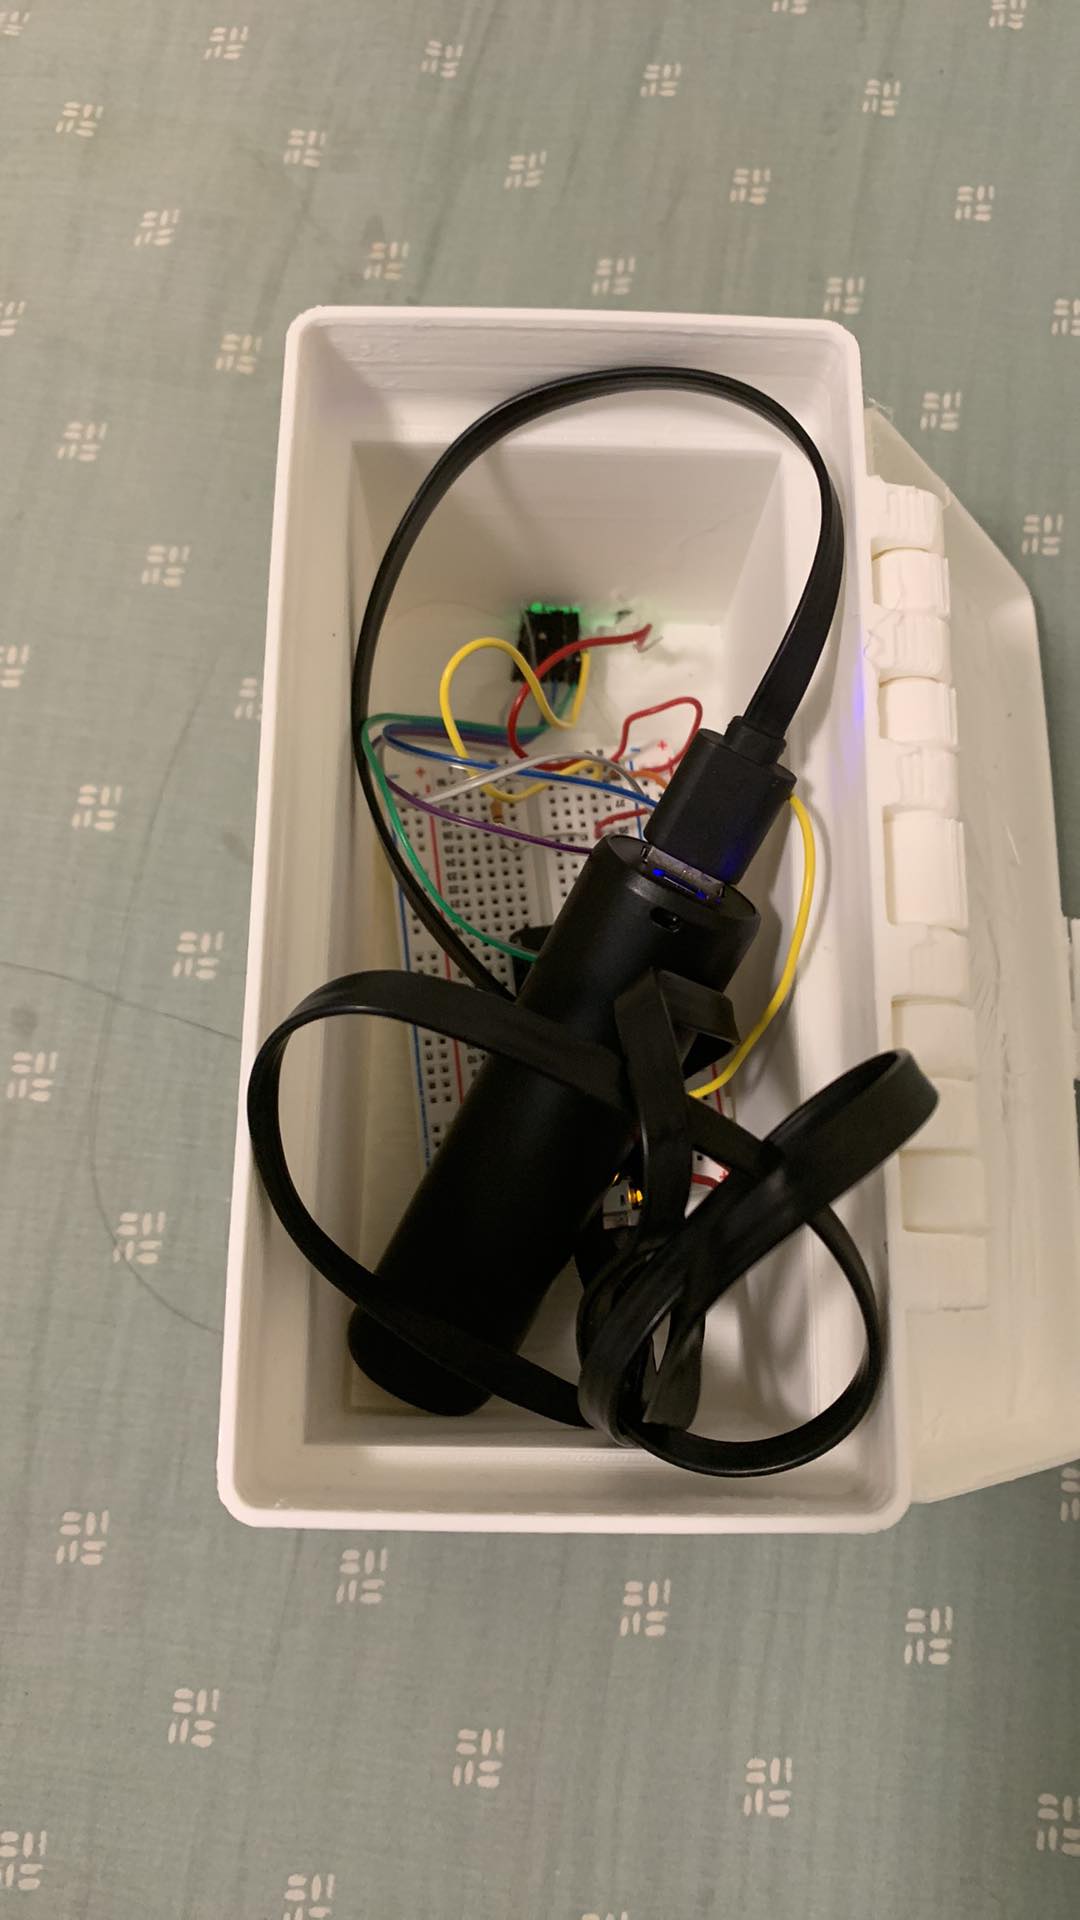
Assembling the different parts together
Because I was in isolation due to COVID, my soldering composed of twisting the wires together and using the hot glue in my room to secure the wires together.
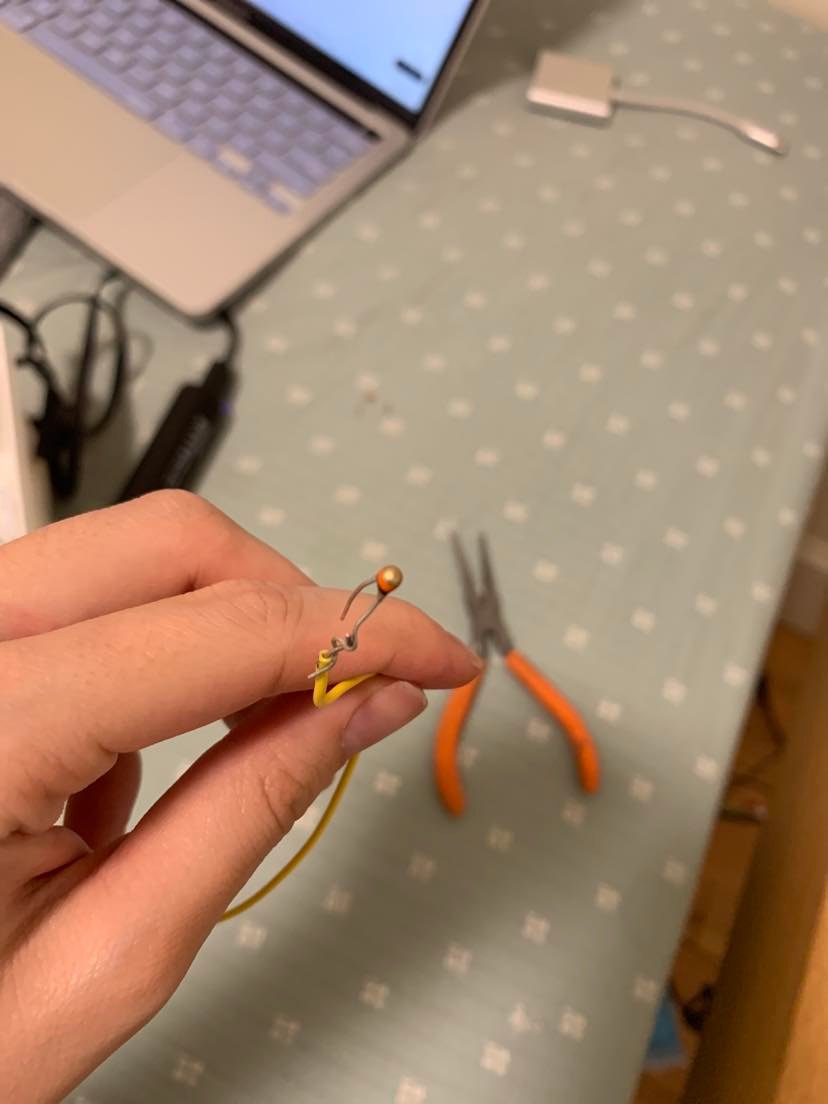
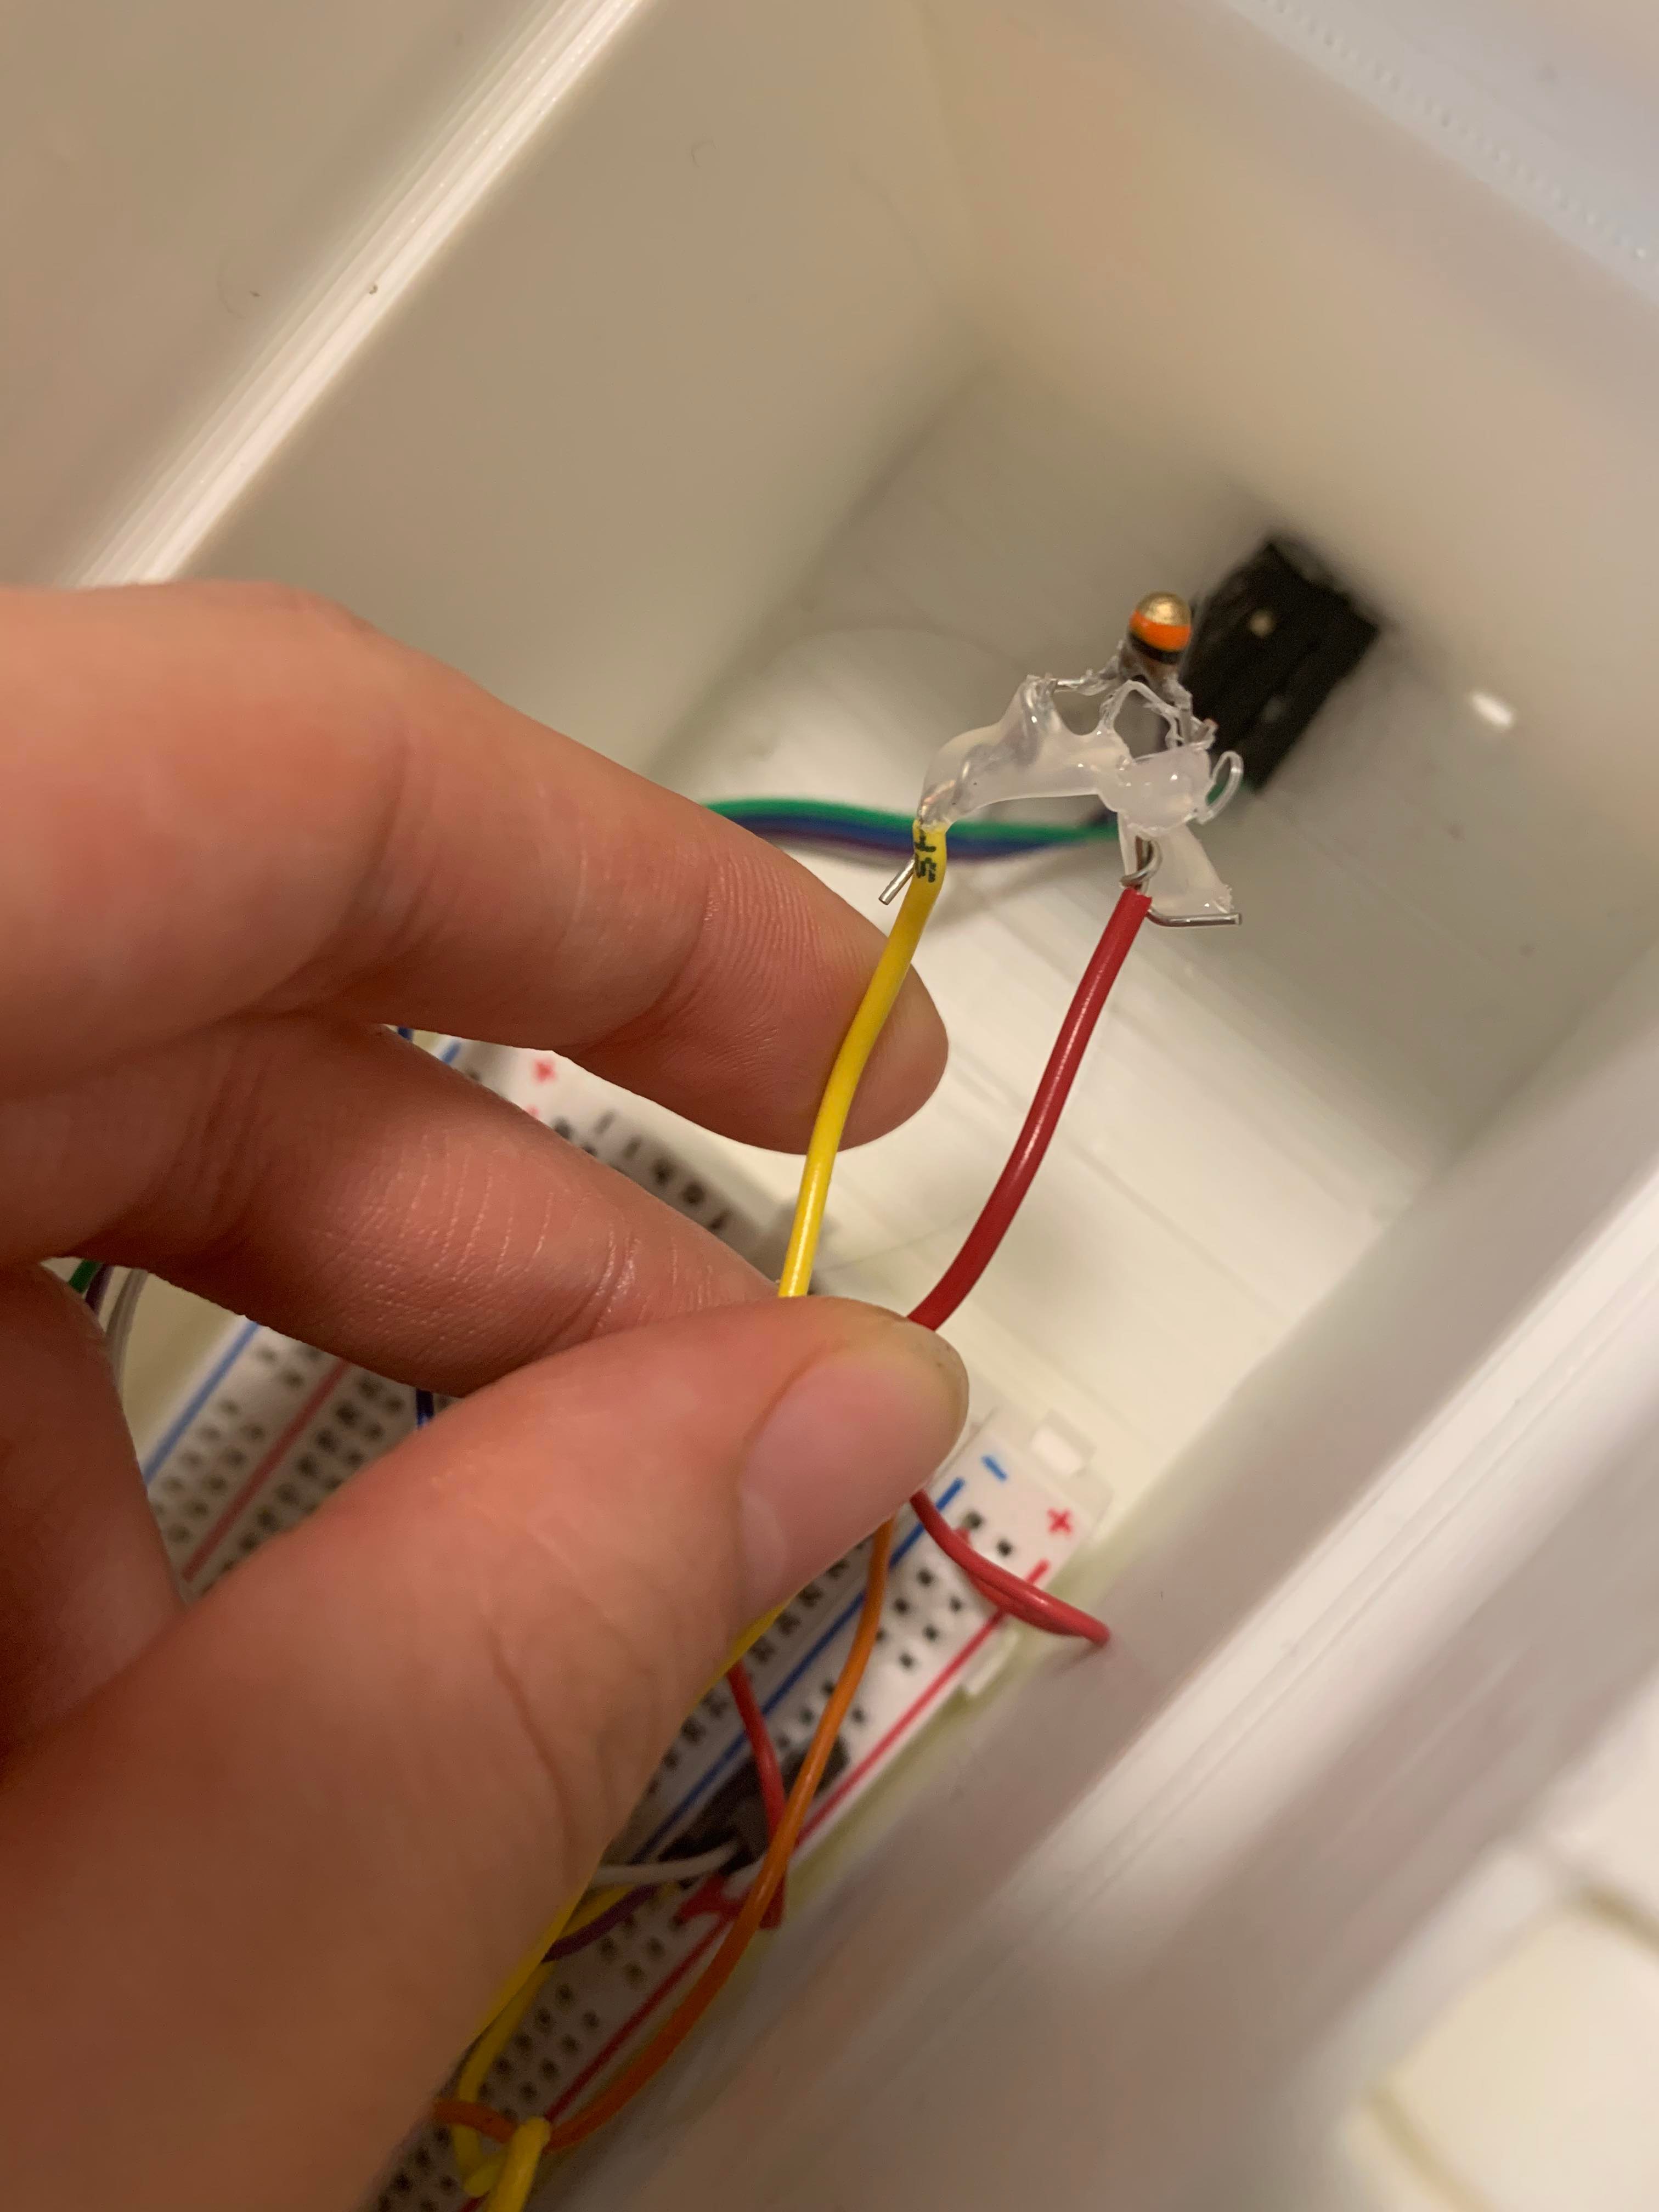
I first placed my breadboard, complete with everything plugged in, into my box. Yay it fits! I then secured the female end of the wires for the gas sensors using glue and to ensure that it would secured tight enough for the gas sensor to easily plug into it.

I then plugged in my gas sensor and ensured it fit in well. For maximum security, I also glued down the gas sensor with a dab of hot glue, but this is optional, especially if you want a design that's more modular.
I then "soldered" (aka twisted and hot-glued in my room) the wires to the thermistor. That way, I can reach the hole designed for the thermistor from my breadboard
Here is what it looked like at the end!
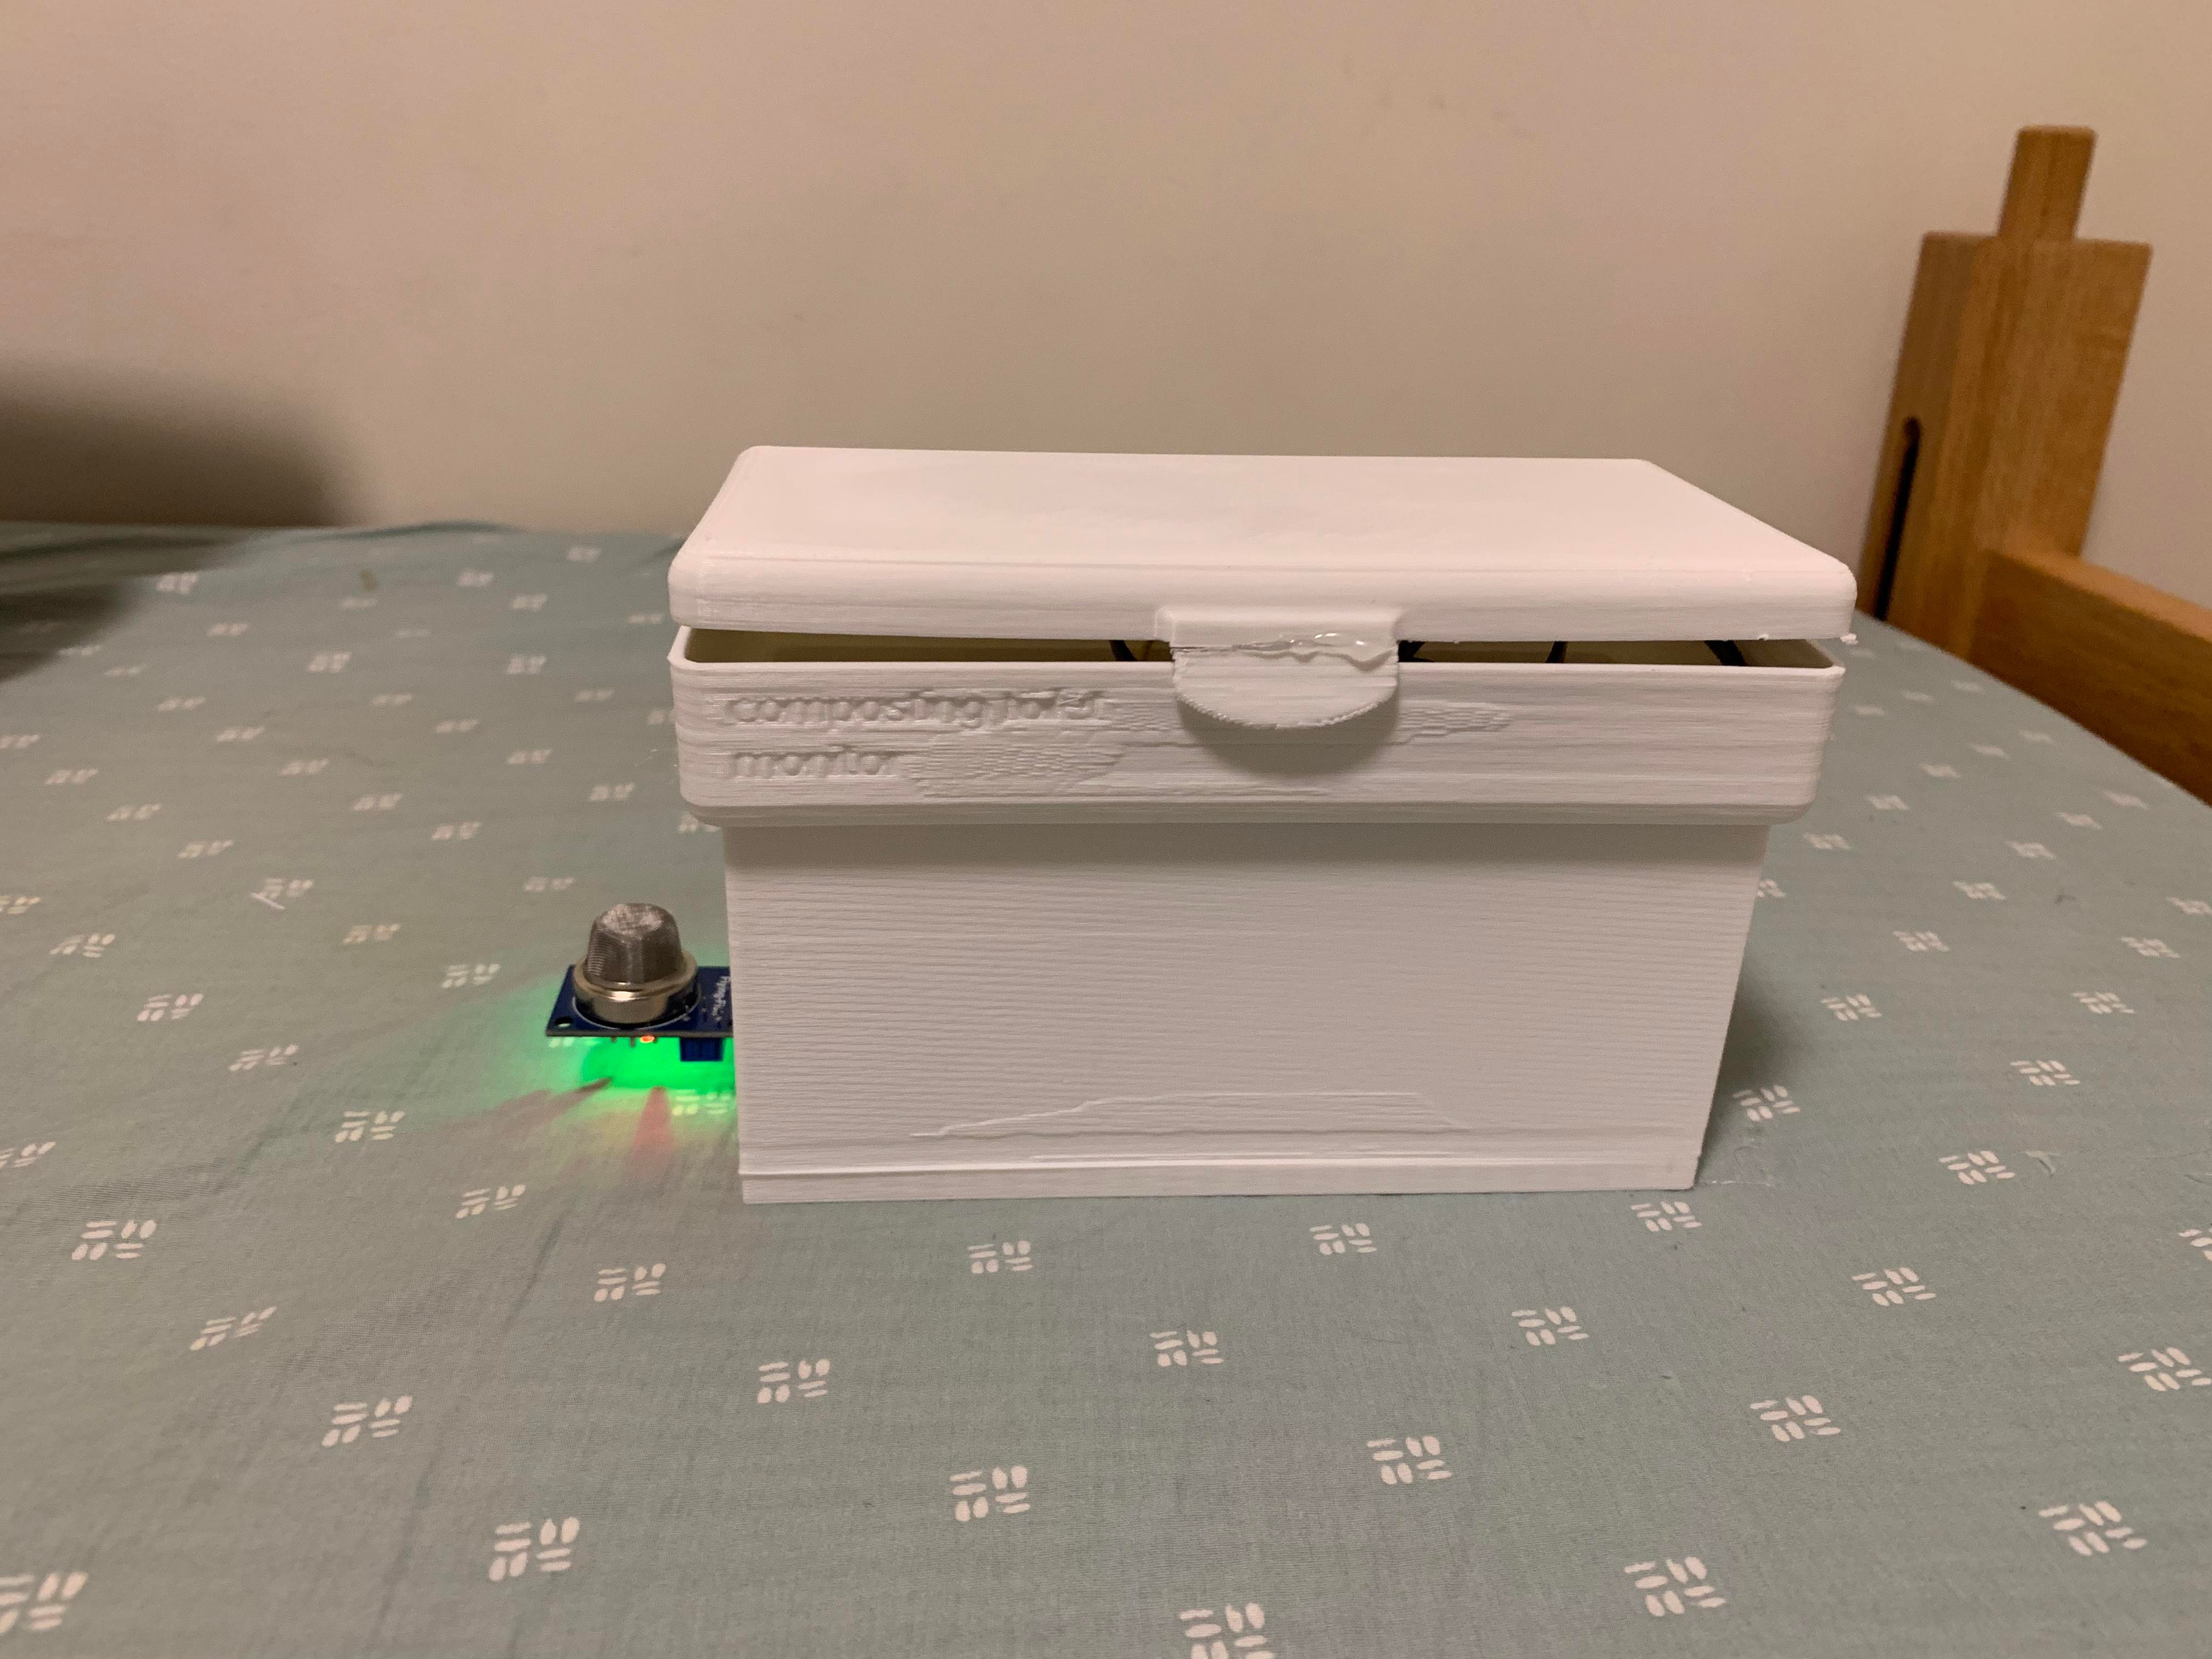
It worked!!! I was able to get the correct interface when I ran it :) (again, I set 30 degrees C as the cutoff for the temp and 800 units for the gas level and was going to change it once I was out of quarantine and had the opportunity to test with real compost. For now, it is a proof of concept)
It even looks like a toilet tank!
Future directions
- Originally, I was also going to integrate a pH sensor, but it did not arrive--no worries-- and hence would be a good future direction. Although, pH sensors are super finnicky and hard to work with ( and better to use in liquid), so I'm not sure if I would actually use it.
- Since I was in isolation, I was unable to test my device on actual compost and provide the precise cutoff values for what temperature and methane level indicates that the compost is ready. Before I got COVID, I was planning to go to nearby compost pits and see what the temperature and methane level value is. Hence, actually testing the device and getting these values would be important.
- I would also like to fix the tolerance issue to make the gap between the lid and the box tighter. Moreover, I would also make the clasp tighter and less thin.
Reflections
Overall, I'm really happy with the way this project turned out! I've learned a lot throughout the process, such as how to set up an ESP32 to be an access point.