Week 11: Computer Programming
Background
For this week's project, I'm using Firebase to give a visual display of if your compost is ready.
I was inspired by the app "Is it dark outside," which is an ironic app that literally tells you if it's dark outside. It's the only thing the app does.
I too, wanted to make a very simple interface much like "is it dark outside" that will tell you if your compost is ready. Hence, it's called "is your compost ready?" and will take input from a thermosister and display a red square if
Although I plan on using my ESP32 for my final project as the access point, I wanted to explore how to use Firebase, which relies on a router with internet access.
I'm super interested in toilets, and one of the ways in which toilets are made more accessible in some parts of the world to people who do not have comprehensive sewer systems is through the creation of compost toilets. Essentially, it's a toilet that turns waste to compost without additional energy or water input.
I wanted to use a monitor that could use sensors to tell you if the compost is ready or not. For this week's project, I wanted specifically to have temperature as the input. After all, compost warms up when it is ready.
Hence, for some places where there is nearby router access, this may be a viable option in lieu of my final project setup where the ESP32 acts as an access point.
References
These were both fantastic resources I referenced throughout this week.
Arduino code and Breadboard (Input)
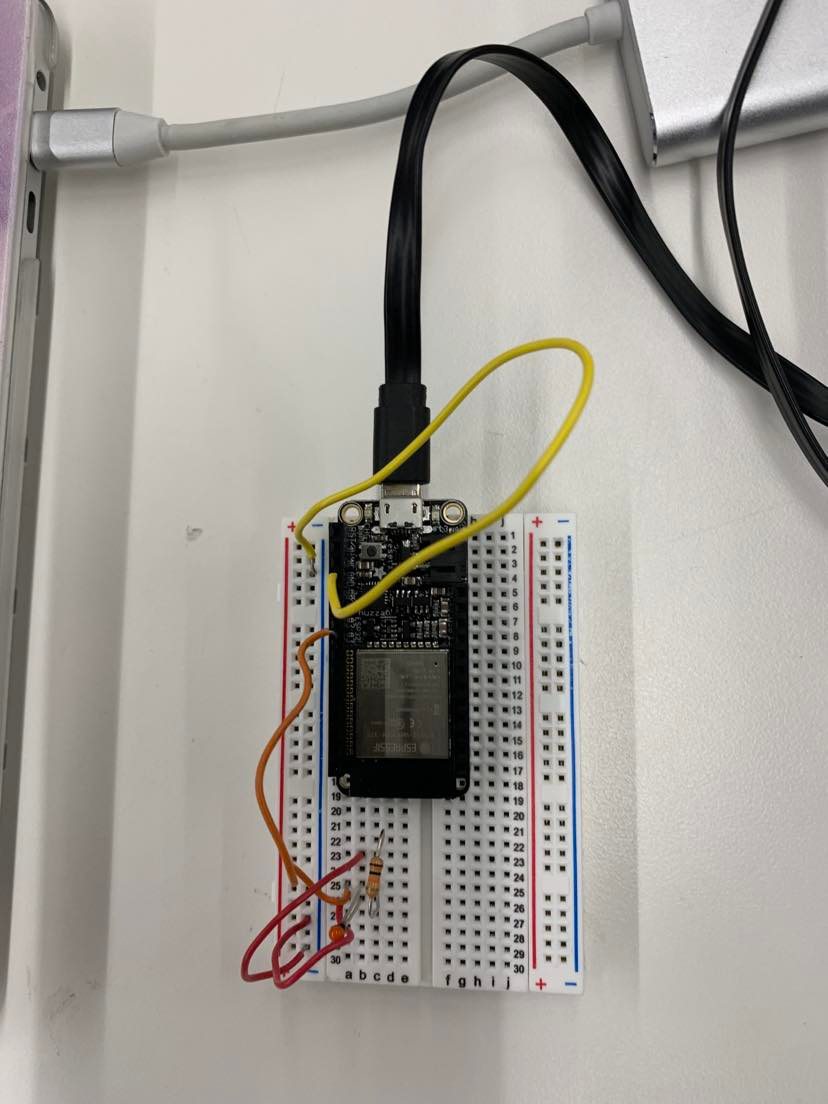
I set up my breadboard to have a thermosister. Thus, temperature could be an input. I've worked on running and calibrated the thermositer in a previous week (see electronic input week)
Here is a picture of my breadboard. I simplified some of the wiring for this week and tested it out. I know it works because there is the expected temperature written out on the serial monitor and serial plotter when I run the code!
Below is my code. In the first part of the code, I set up the Arduino software to connect with Firebase. I was able to get information like the Firebase_host after I set up a Firebase account and created a project specifically for the composting toilet. The Random Nerd Tutorials Website I linked above goes through how to set up a project.
I referenced the LED code on Nathan's website (linked the resources header above) for the parts that I needed to plug in the information of my Firebase and Wifi. I also made sure to have the Firebase library and Wifi library installed.
I then decided to only include Celsius (unlike prior to week 6, where there were different units like Kelvin and Farenheit and corresponding plots) for the temperature.
I wrote in an if statement for my temperature code. That way, it knows to tell Firebase that the compost is not ready if the temperature is below 25C. However, if the temperature is above 25C, it tells Firebase that the compost is ready. For future reference, Rob also has a temperature code on his website that could also be adapted in (https://roberthart56.github.io/SCFAB/SC_lab/Sensors/Thermistor/thermistor_read.txt (opens in a new tab)) to work on Firebase.
#include <WiFi.h>                                 // esp32 library
#include <FirebaseESP32.h>                        // firebase library

#define FIREBASE_HOST "https://composting-toilet-default-rtdb.firebaseio.com/"  // the project name address from firebase id
#define FIREBASE_AUTH "aVCTxxSc8jW5FmuHXf9d4qV5meHiMNsqkecpMDJv"                          // the secret key generated from firebase
#define WIFI_SSID "MAKERSPACE"                                // input your home or public wifi name
#define WIFI_PASSWORD "12345678"                            // password of wifi ssid

String fireString = "";                                          // led status received from firebase
#define RT0 10000   // Ω
#define B 3977      // K
//--------------------------------------


#define VCC 5    //Supply voltage
#define R 10000  //R=10KΩ

//Variables
float RT, VR, ln, VRT, TE, TI;


//Define FirebaseESP32 data object
FirebaseData firebaseData;

void setup() {
  Serial.begin(115200);
  delay(1000);
  WiFi.begin(WIFI_SSID, WIFI_PASSWORD);                          // try to connect with wifi
  TE = 0;
  TI = 25 + 273.15;                 //Temperature T0 from datasheet, conversion from Celsius to kelvin

  Serial.print("Connecting to ");
  Serial.print(WIFI_SSID);
  while (WiFi.status() != WL_CONNECTED) {
    Serial.print(".");
    delay(500);
  }

  Serial.println();
  Serial.print("Connected to ");
  Serial.println(WIFI_SSID);
  Serial.print("IP Address is : ");
  Serial.println(WiFi.localIP());                                // print local IP address
  Firebase.begin(FIREBASE_HOST, FIREBASE_AUTH);                  // connect to firebase
  Firebase.reconnectWiFi(true);
  Firebase.set(firebaseData, "/TEMP_STATUS", "NOT READY");              // set initial string of "OFF"
}

void loop() {

  Firebase.get(firebaseData, "/TEMP_STATUS");                     // get input from firebase
  fireString = firebaseData.stringData();                        // change to e.g. intData() or boolData()
  Serial.println(fireString);


  VRT = analogRead(A0);              //Acquisition analog value of VRT
  VRT = (5.00 / 1023.00) * VRT;      //Conversion to voltage
  VR = VCC - VRT;
  RT = VRT / (VR / R);               //Resistance of RT

  ln = log(RT / RT0);
  TE = (1 / ((ln / B) + (1 / TI))); //Temperature from thermistor

  TE = TE - 273.15 -11;                 //Conversion to Celsius
  // Serial.println(TE) //used for debugging and verification of temp

  if (TE> 25) {
     Firebase.setString(firebaseData,"/TEMP_STATUS", "ready");
  }
  else {
     Firebase.set(firebaseData,"/TEMP_STATUS", "not ready");
  }

  delay(1000);                                 // not strictly necessary
}
To note, I had to use the Makerspace Wifi since it has less security, which allows this to work.
This then feeds it into the Firebase database, which I'll detail below.
Firebase
I set up my Firebase by following the instructions on Nathan's Website Nathan's website on firebase: https://nathanmelenbrink.github.io/ps70/10_networking/huzzah1b.html (opens in a new tab)
Random nerd tutorials is also useful as another way to explain it: https://randomnerdtutorials.com/esp32-esp8266-firebase-gauges-charts/ (opens in a new tab)
I was able to make my composting toilet firebase working! :)

This is what the Realtime database looks like
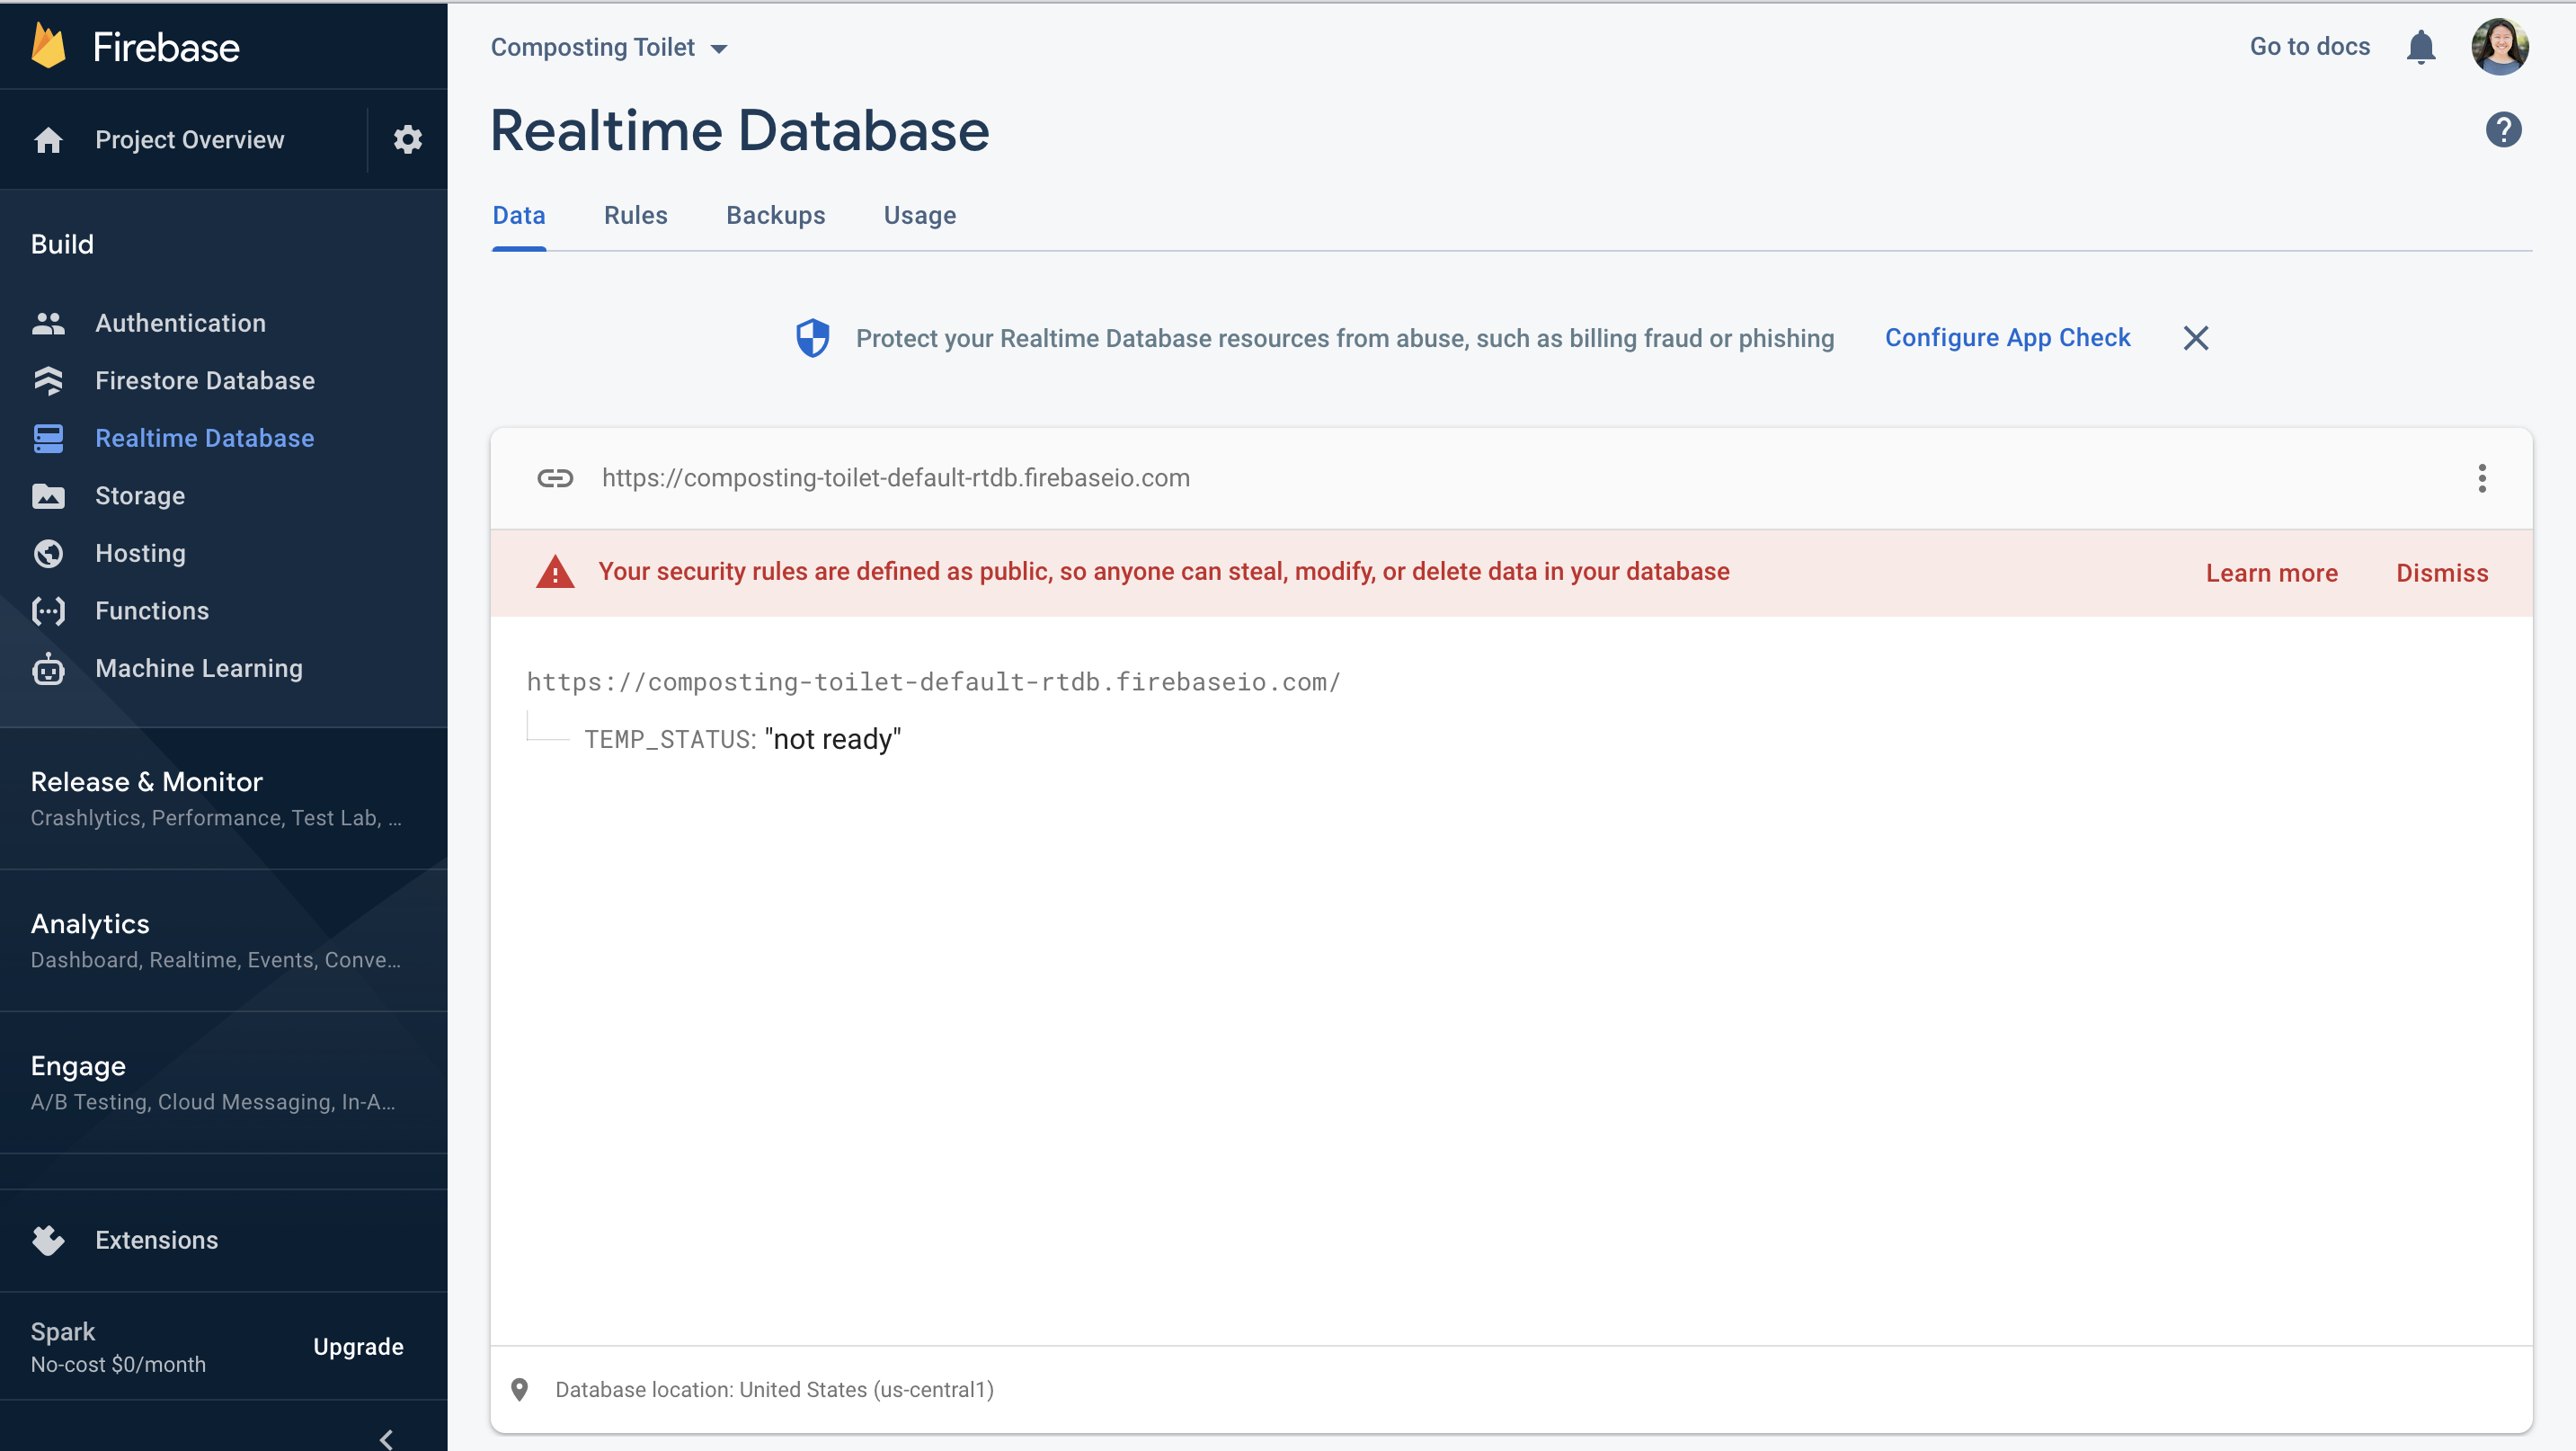
Based on the temperature and the Arduino code I showed above, it either states that the Temp_status is ready or not ready.
Hence, right now, since the temperature is not >25 degrees Celsius, it says "not ready" (As verified by my thermometer, which says the temperature is less than 25 degrees + serial monitor when I put in a line of code so that my serial monitor displays the temperature).
When I moved my thermosister closer to my heater and put my finger over it as well, it became >25 and changed it to "ready." This is as confirmed when I uncomment a line of code so that my serial monitor displays the temperature.
HTML Interface
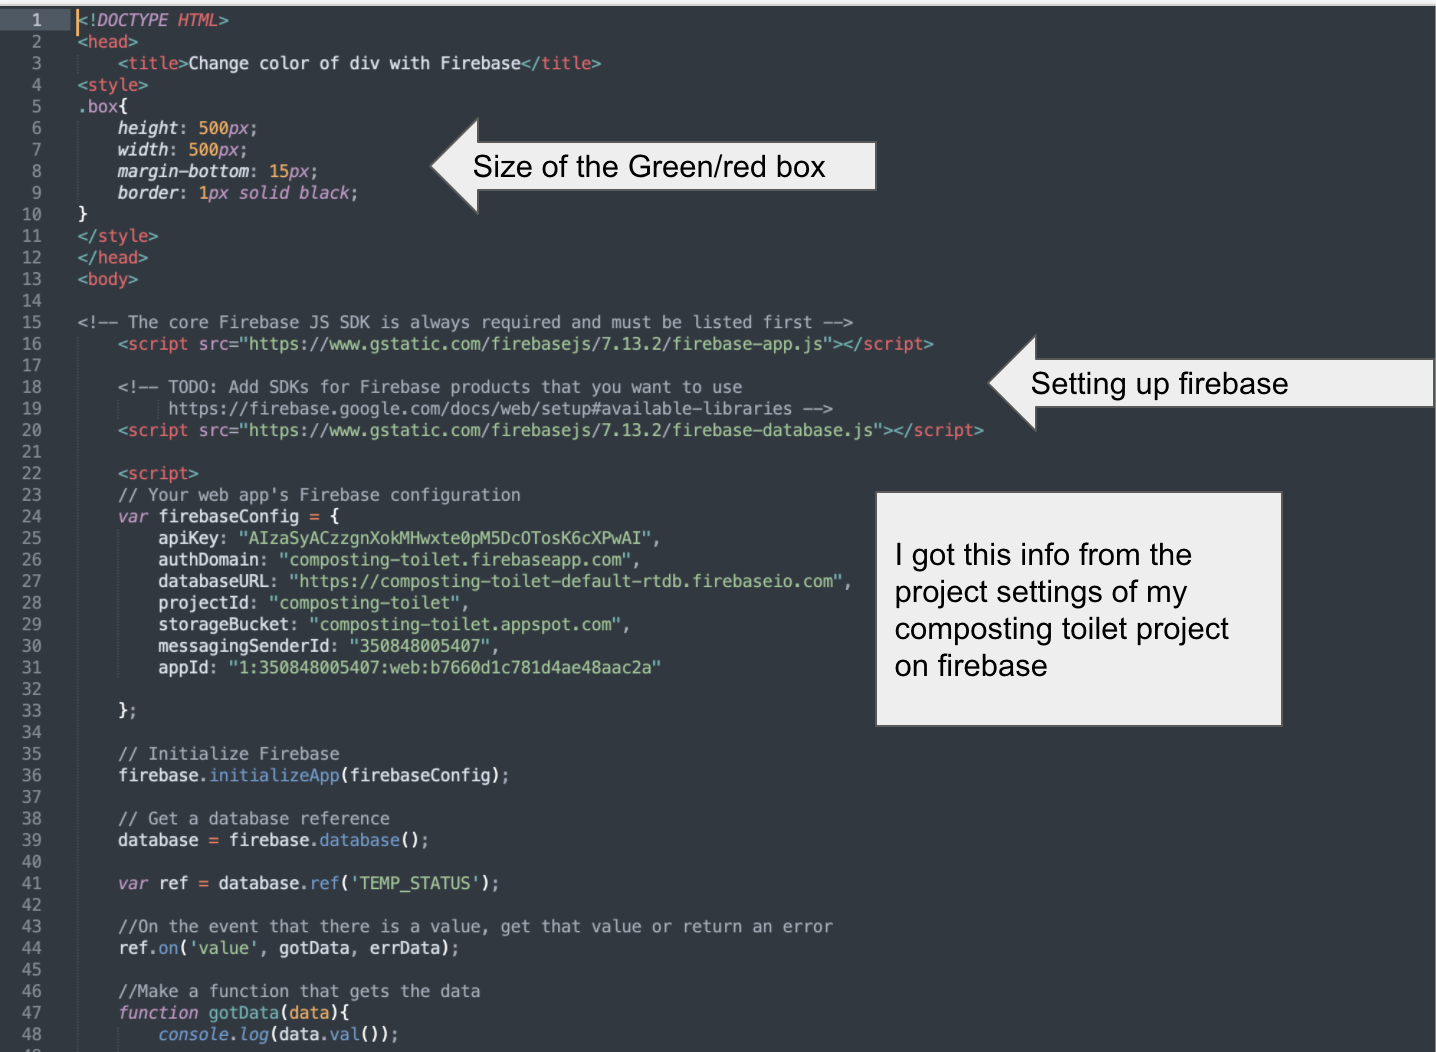
This is the code I had worked on (Shoutout to Kassia for helping!!). (It's screenshots of it because my HTML got mad at me that I was pasting in HTML code, and the codetags wouldn't work for). I made arrows and white boxes to emphasize the essential components of the HTML code.
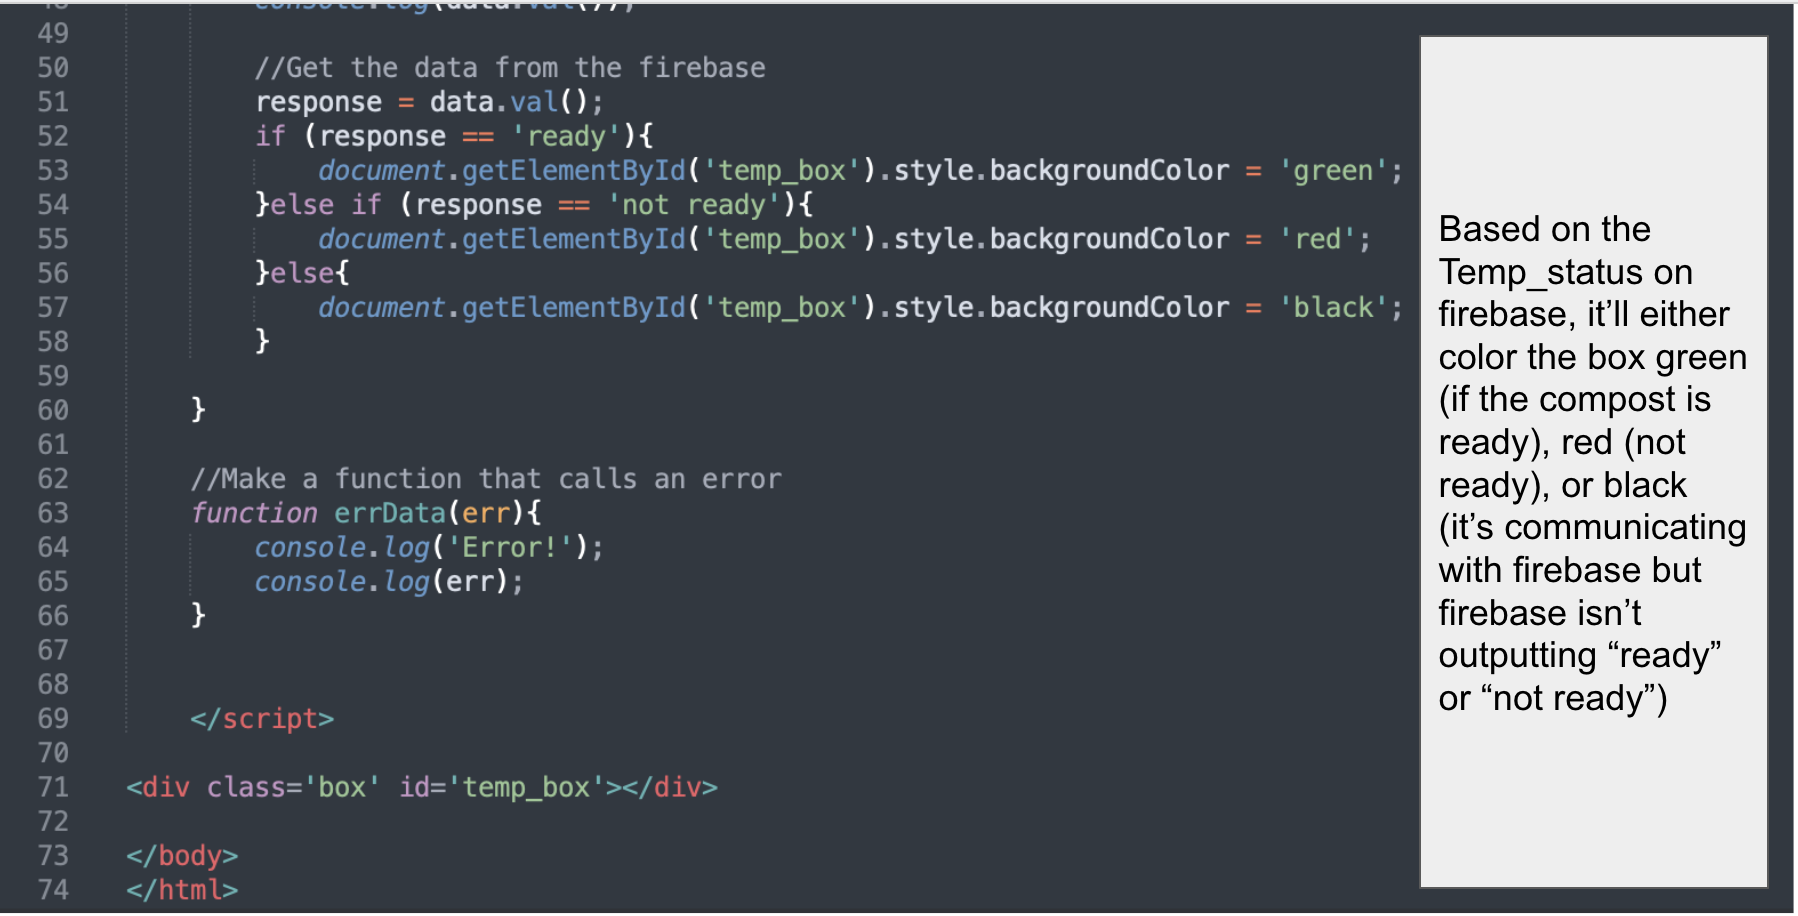
When Firebase displays "not ready", it displays a red square


When the Firebase displays "ready", the html website displays a green square.


Altogether, when the thermosister reads the temperature is more than 25 degrees C, the arduino code tells Firebase to display "ready". This then makes the square turn green. When the thermosister reads the temperature is less than 25 degrees C, the arduino code tells Firebase to display " not ready". This then makes the square turn red.
Variations + notes
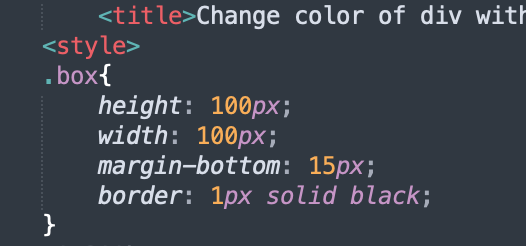
I also spent some time trying out different sizes of boxes. For instance, originally, I had the box much smaller, but realized it was hard to show around during show and tell Hence, I altered the HTML code to make it a 500 x 500 sized square rather than 100 X 100 Here's what the dimensions of the box looked like before
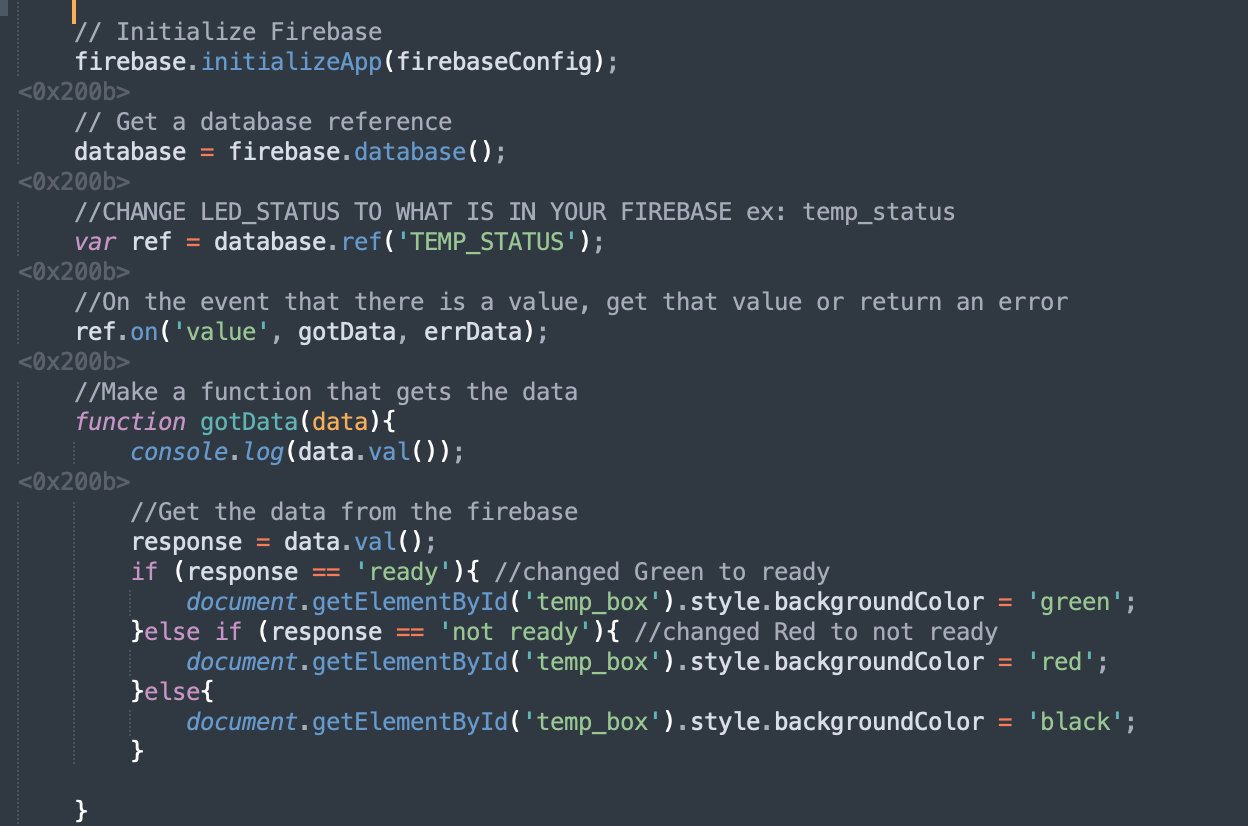
Moreover, when I was trying to debug with Kassia, we communicated via Slack. She kept on saying the code worked for her but it didn't work on my computer. Turns out there are these ghost numbers, presumably that appeared when I copied a debugged code from Slack. (notice the 0X200b in gray)
Also, to note, in my original temperature code from previous weeks, I had used the variables TX and TI to indiciate the temperature and the initial temperature respectively. However, it seems to coincide with some other variable names in ESP32 or the wifi communication process. Thus, I got a lot of error messages and had to change it to TE and T0 respectively.
Reflections
Ultimately, I'm super happy with the result. I like it seeing it change from a red square to a green square depending on the given temperature. It's simple, just like "Is it Dark Outside :)"