Week 2: 2D Design & Cutting
Porphyrin Box
Background
If you haven't gotten to known Dilek yet, you're missing out. Dilek is the most amazing and wonderful human being: kind, smart, the entire package, really. She was the instructor of my Experimental Inorganic ?(Chem 145) course and also my Inorganic chemistry (Chem 40) course. In Chem 145, I was fortunate enough to work with my project team to create these aromatic compounds (fancy word for molecules with rings in them) called "porphyrin." We were able to substitute metals into the center of these porphyrins and make novel porphyrin molecules.
I wanted to give a gift for Dilek to thank her for all of her hard work and help throughout Chem 40 and Chem 145. Chem 145 was such a magical experience, and I'm so fortunate for this experience.
I wanted to make something practical for Dilek but also has flair. Thus, I decided to make a box with a porphyrin molecule on top.
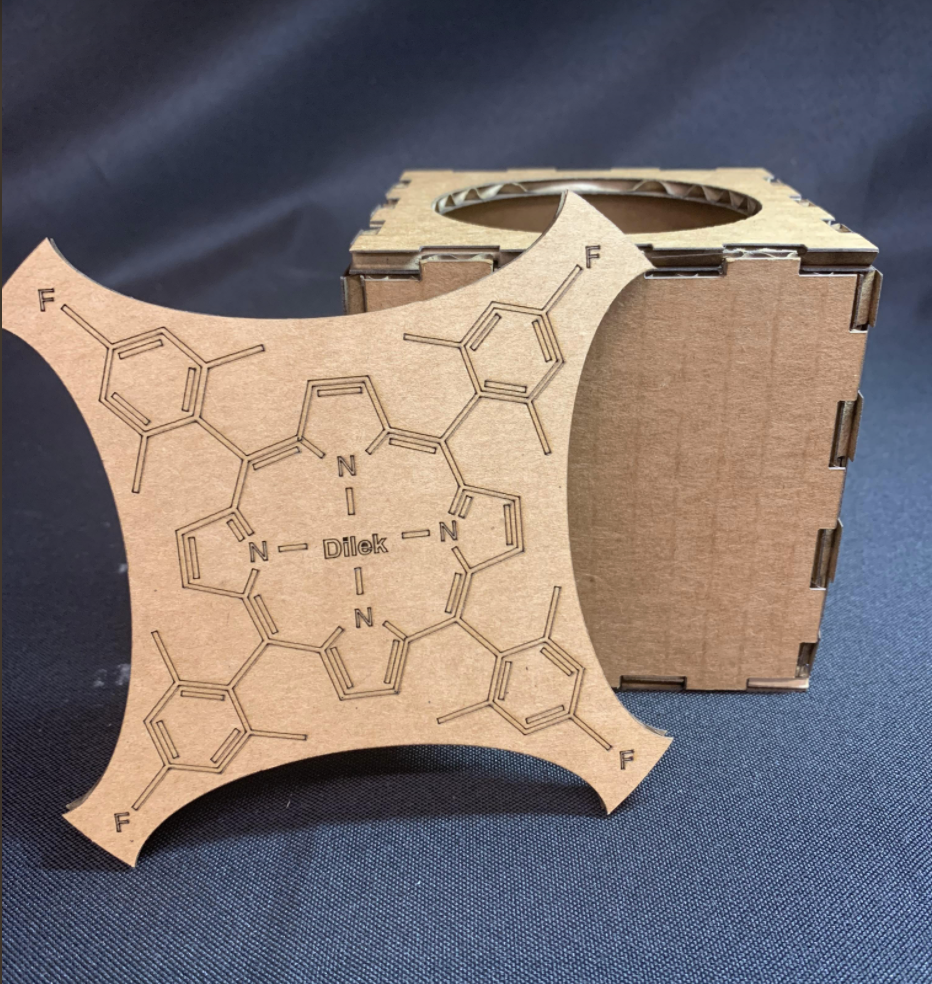
This is the final piece. It is a box with finger joints (7 grooves on each side) and a hole on top. The porphyrin molecule, glued onto a circle that snapes onto the box, is the lid.
Designing the box
To do this, I first sketched a design on my iPad. I then measured the width of the cardboard and got 4.5 mm. I designed the box on Fusion. At first, I tried to make a 133 mm by 133 mm (since 133 is divisible by 7) square and cut out the notches (4.5 in depth + kerf) from it. However, at the time, I couldn't figure out how to cut into the empty space of the box. Thus, I remade my file to be a smaller square (124mm by 124 mm) and added the rectangular notches to it (a 4.5 X 19 mm rectangle, with adjustment of kerf). However, later, I realized that due to how a laser cutter works, either would work (basically, I lost a day's worth of work unnecessarily). This is an early file of what me working on one of the squares looks like .
I then measured the kerf by cutting out two sample squares with different notch amounts along the side (I tried 0.2-0.8 mm). and tried to see what "snapped the best."
For me, and the cardboard I used, (I later realized that there were different thicknesses of cardboard available at the lab), I had a kerf of 0.3 mm on each side of the length of the notch (0.6 per notch) and for the depth, it was 1/2 the kerf of the length, which is 0.3 mm.
Here's an example of one of the things I printed out to see kerf.
I then adjusted my notches to account for the kerf. (I had originally entered a parameter of kerf, and so just had to enter what the kerf is). Since I was doing notches, I could either add to the material of each notch or subtract the kerf from the gap (I confirmed with a TF about this). Thus, I then adjusted my file's dimensions and printed it out again. One note about my design: the bottom and top squares are the same (with the exception of the hole of the top square), the left and right square have the same design of notches, and the front and back squares have the same design.
Dimensioning took a while, especially since I had 7 indents per side of the square. This is what the fusion file looks like when done. To note, each piece adds to each other. Throughout the process of using Fusion, I used the break and trim tools a lot. Otherwise, as I saw in my early prototypes, any stray lines will be cut by the laser cutter. One of my early mistakes was not removing the line between the notch and the main square body, which resulted in my notches being chopped off.
After I finalized my design, I sent it to the 3D printer. After the pieces were printed out, I made sure I snap together the different pieces together. It was so satisfying to snap!
Designing the lid
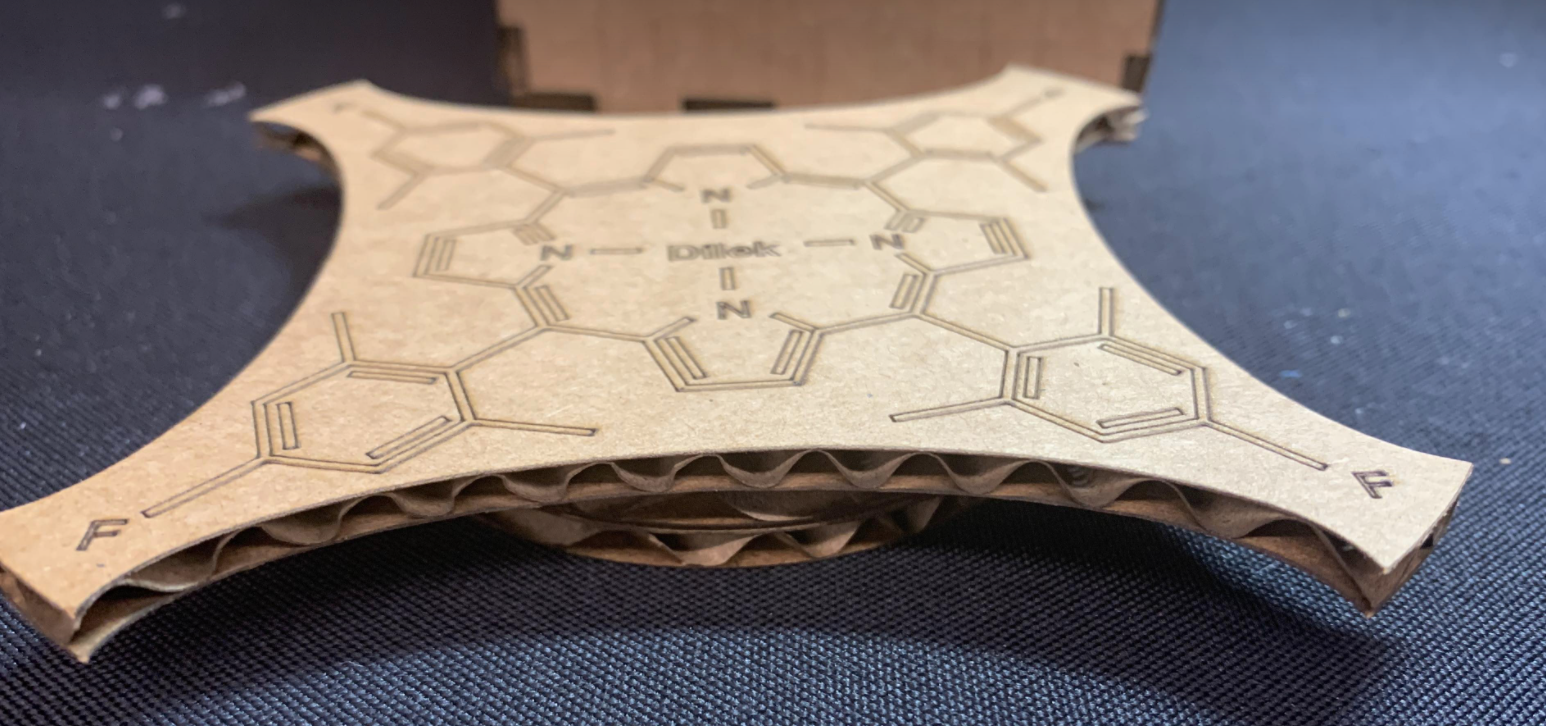
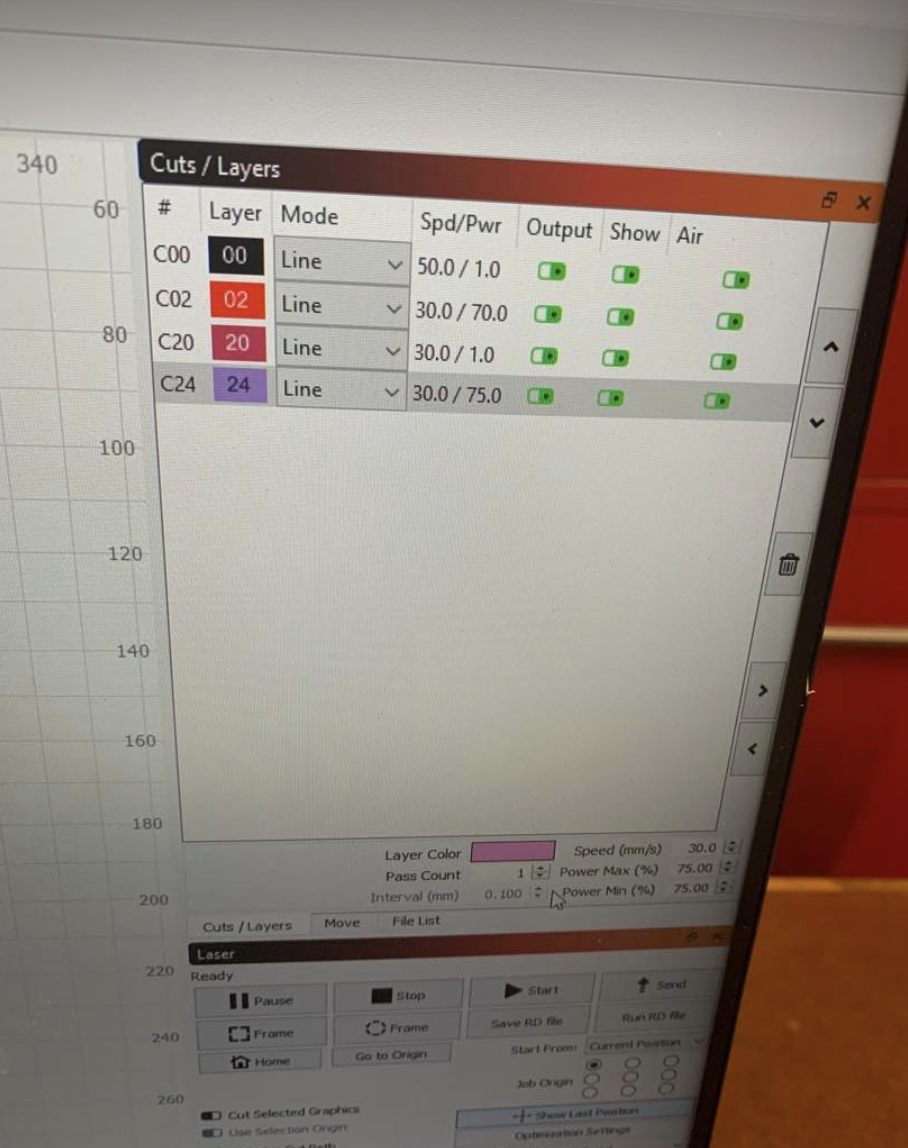
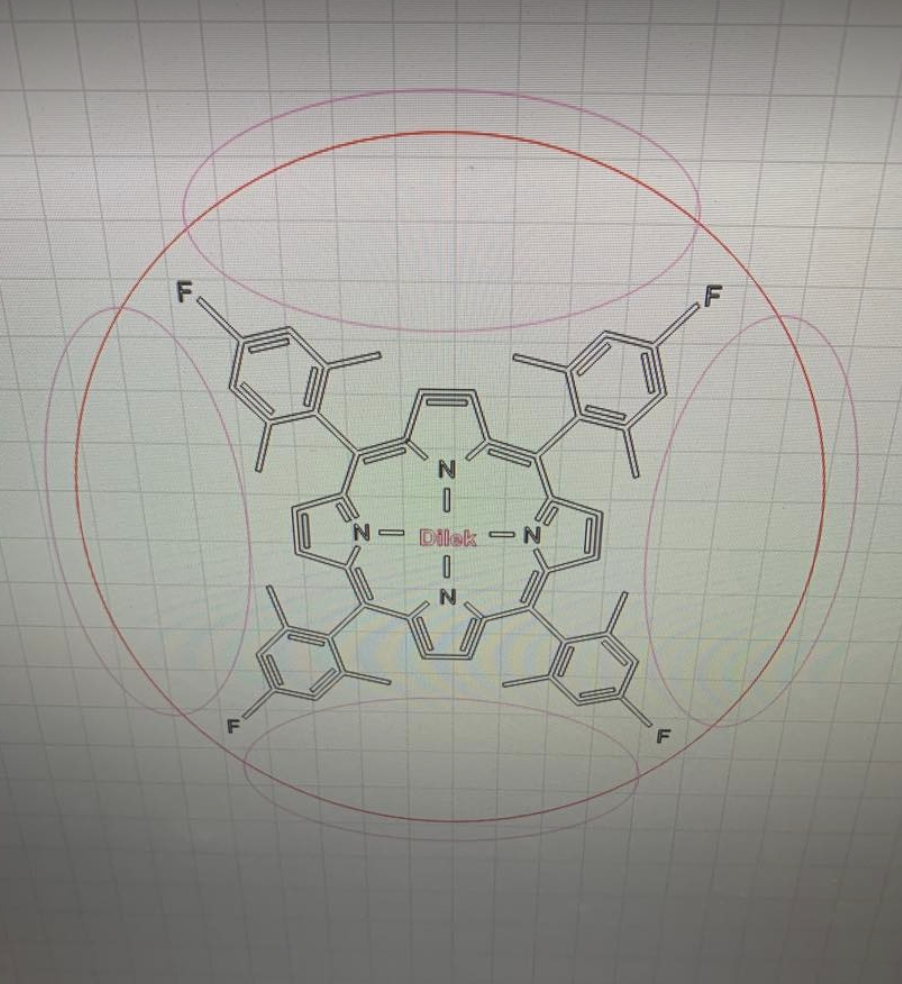
I then made the lid. I had to account for kerf for the circle that fits into the lid also. Hence, I cut out a variety of circles and tested out which ones fit into the hold on the lid the best. I then glued another circle on top to make the lid "pop up" even more. I then made the porphyrin design to glue on the lid. I first made a ChemDraw file to draw the molecule and I consulted my little brother to convert it to a Fusion file. This took a LONG time since the different angles had to be built from scratch (if you look at my porphyrin engraving, it's not just lines--rather, it's the outline of the molecule). Since I wanted an outline around the drawing/shape of the porphyrin, I used ovals to cut out the shape. On the laser-cutting computer, I then used different colors with corresponding depths to make sure I was cutting out the outline but etching in the porphyrin design. The right speed and power to accomplish this took a couple of tries, especially since the design is intricate.
In addition, I originally had a cut of the lid that looked too square-ish.. Then, I had the porphyrin engraved on a circle, but it seemed too basic. Hence, I redesigned the outline to be more curvy.
Ultimately, these were the settings I used.
I then attached the porphyrin to the circle lid that snaps into the box to yield my product!
Here is a cool video (opens in a new tab) of the lid design being cut out.
Putting Everything together
Here are all the different pieces I ended up with
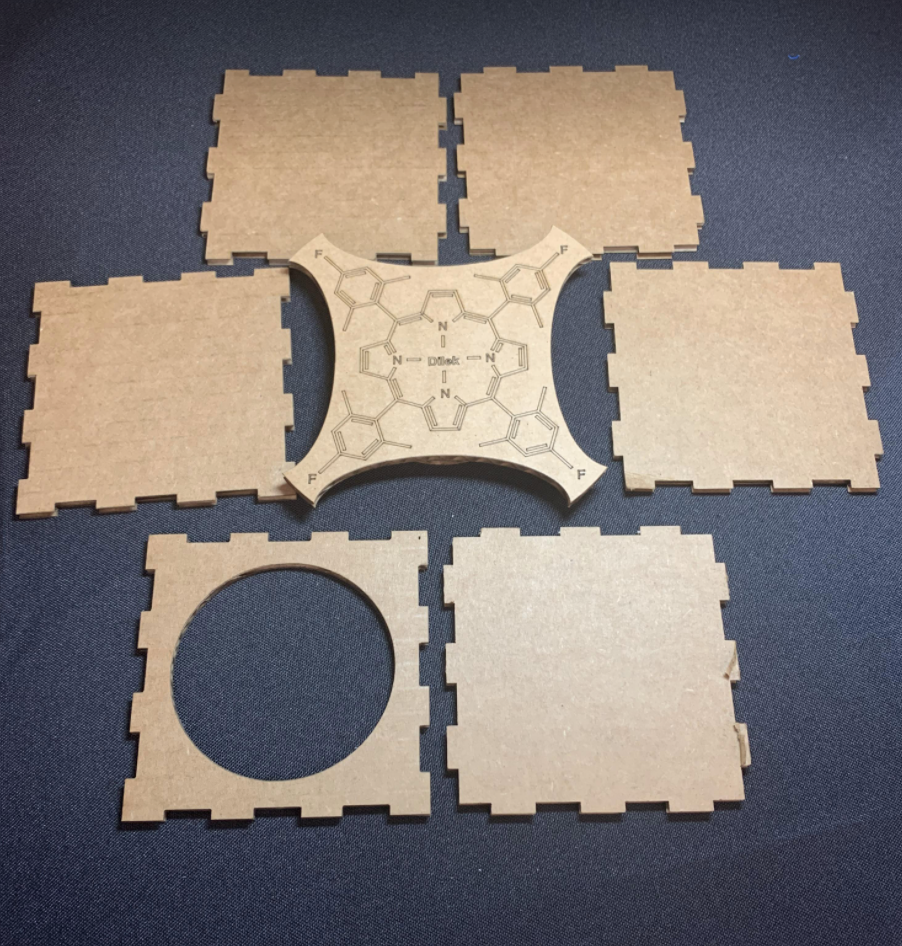
I then snapped them together to get my final box!
Modeling two lab items
The other part of this week's assignment was to model two items from lab or from home. The two items I decided to model are an acetone bottle and pliers. Nate told me that we could integrate the tutorial version. Aka I watched this tutorial (opens in a new tab) and followed along while modeling my two objects. To note, this tutorial was useful but referenced commands/clicks from the mouse a lot, which I did not have access to. Hence, I decided to also Google things as I go.
Acetone bottle
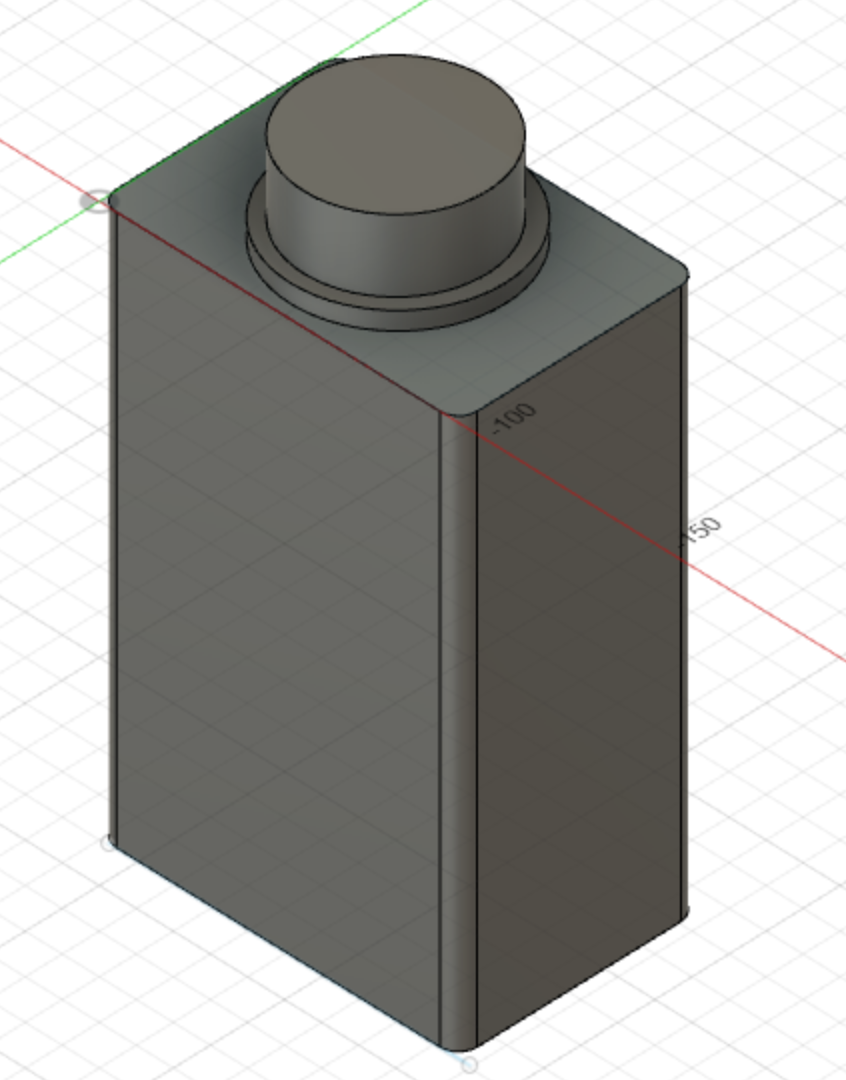
The first item I modeled was an acetone bottle. I started off with measuring the dimensions of the bottle with a caliper and recording it down. I then sketch the corresponding shape with the dimensions (154 by 97.34 mm) and extruded it out to the depth I needed them to be (65 mm). I then used the fillet tool with a radius of 5 to fillet the edges. From the top view, I also tried the additional border of extrustion that is present on the top of the acetone bottle. However, error messages kept on popping up when I tried doing that and Fusion kept on crashing, so for full transparency, I did not include it but will instead describe how I would have approached this last part. I would use a rectangle to sketch on the top view and extrude it by 1 additional mm. It's a minor detail that would make it look even more accurate.
Acetone Bottle Lid
The cap had an outer diameter of 52.87 and an inner diameter of 49.46 mm. Hence, I first extruded the outer circle, then placed my concentric inner circle in the outer circle and extruded it further.
Fusion crashed a couple of times I worked with this (frusturating, yes). Example of it crashing
But eventually I got it and here is the product!
Pliers
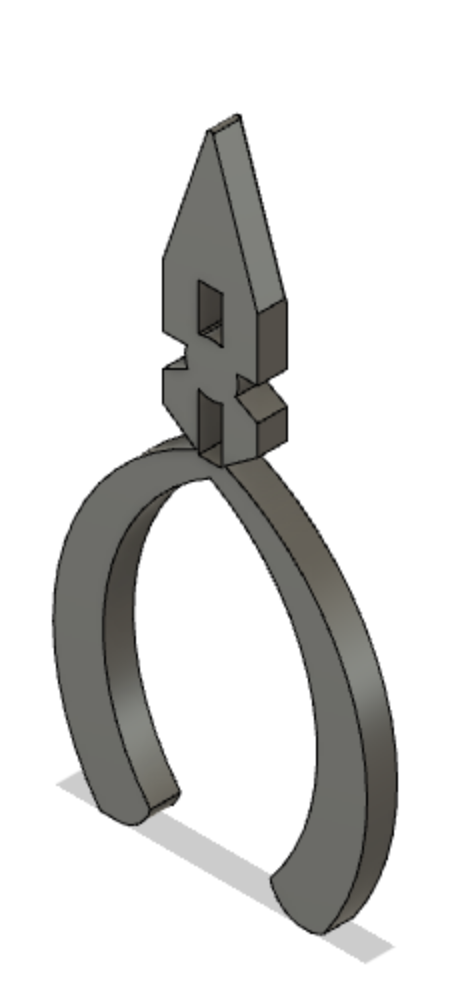
The second item I modeled wwere a pair of pliers. I started off with measuring the dimensions of the bottle with a caliper and recording it down. I then sketch the corresponding shape with the dimensions and extruded it out to the depth I needed them to be. I sketched the model with the dimensions on paper. The width of the rectangular hole for the the pliers was 1.3 mm. The circle on the pliers has a diameter of 1.6 mm. The notch beneath that circle was 1.30 mm. From the plier handles to the legs of the pliers, the length was 91.56mm. The inside of the handle had a width of 21.27 mm and the width of it was 46.32 mm. The bottom of the handle to the middle where it started curving out was 42.15 mm. To make the corner of the handle curved, I superimposed a circle and used the trim tool to make my desired shape.
Honestly, modeling this was difficult: since I've never used the arches before, it was difficult to get the best arch for the handles. I ended up using the mirror tool. to reflect, but this is honestly something I could improve on since, as you can see, my handles still look a bit off.
Here is the final product!
Ultimately, learning how to model on Fusion has been a good experience for me, and I look forward to continuing to develop and improve my skills in it!